| Speed Tweaks 6 Apr 2002 @ 10:47AM Updated: 9 Feb 2010 @ 10:47AM Welcome to the second half of my Windows 2000 tweak guide. Whereas the first tweak guide was focused primarily on networking and connection speeds, this series of tweaks will be mainly focused on improving the performance of Windows 2000. Before we begin, however, I must give the obligatory CYA (CMA?) statement.
What is offered below is for informational purposes only. Among other things, numerous important system files will be altered. Hacking the registry or any other important system file could be bad for your computer's health. IF YOU CHOOSE TO IMPLEMENT THE FOLLOWING TWEAKS, YOU DO SO OF YOUR OWN WILL. I cannot be held personally responsible if one of the following tweaks kills your computer. As with any other time you play with important system files, it is imperative that you back up the files to a safe place. This will, hopefully, allow you to restore the altered files and make your computer function once more.
Alright, with that out of the way, let's start with the tweaks. Forcing UDMA/66+ Hard Drive Access If you have a computer running windows 2000 that is less than a year or three old, then chances are your harddrive runs at ATA66, ATA100, or even ATA133. Unfortuanetly, by default windows does not take advantage of the enhanced transfer capabilities of these newer drives. To fully take advantage, follow these instructions. Before doing this, please be sure that you have a good (80pin) IDE cable connected to the drive. Without that cable, all of this is pointless. Note that this will NOT work with SCSI devices, nor will it work if you're running any kind of hardware RAID array. Additionally, each IDE controller has two channels. If one channel is occupied by an ATA33 drive, and the other by an ATA133 drive, they will BOTH run at ATA33 regardless of what you do. Separate your fast and slow drives onto different IDE controllers if need be.
Step one is to enable DMA support on your ATA66+ hard drives. To get there you'll need to go to the system properties (right click my computer, properties, or go to the control panel and choose system). From there, go to the hardware tab, then the device manager button. Find your IDE ATA/ATAPI controllers. Now, doubleclick on your primary IDE channel, go to the advanced tab, and under transfer mode make sure it reads "DMA if available". Please note that the Current Transfer Mode must read Ultra DMA Mode. If it doesn't...you may as well stop reading, because this tweak will not work for you.
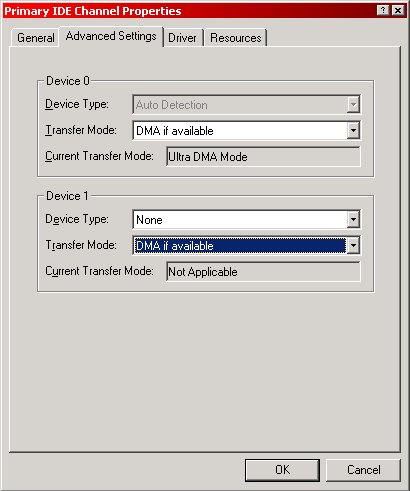
Now, if you only have one harddrive on the primary IDE channel, go ahead and select none for the second channel shown here. It's not used, so it just wastes time during the O/S boot. With that done, ok out of the properties and do the same thing for the secondary IDE controller. Once more, if you have no devices, or only one device, connected to this controller, go ahead and turn the unused channels to none.
Now for the tweak portion. As you may have surmised, we will need to run regedit by going to start | run and typing regedit, then hitting enter or ok. Navigate to the following key:
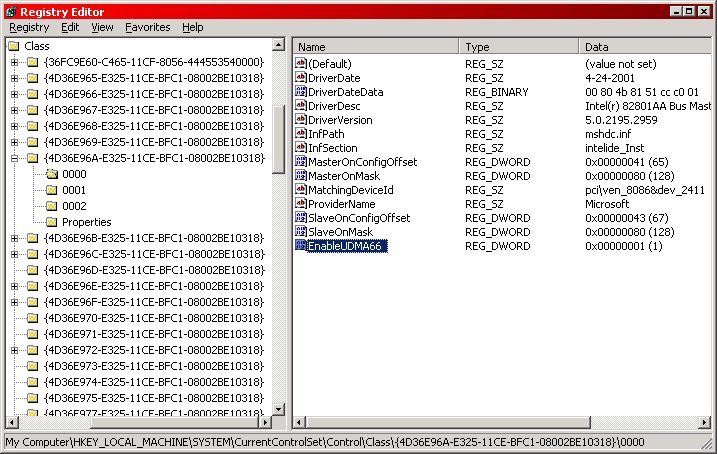
HKEY_LOCAL_MACHINE\System\CurrentControlSet\Control\Class\{4D36E96A-E325-11CE-BFC1-08002BE10318}\0000
The key may actually vary slightly. Rather than 0000, it may display as 0001, 0002, etc. Whatever you have, select your key(s). Now, create a new DWORD value and name it "EnableUDMA66", and give it a value of 1. If, for whatever reason, you'd like to disable this setting later, you can change the value to 0.
And that is it. Reboot the computer for your changes to take effect. Forcing Shutdown If you're anything like me, you run alot of programs. And, like me, you've probably encountered one or two programs that will practically hang the O/S during its shutdown by refusing to close. Eventually the O/S will nag you with a dialog asking if you wish to end-task the program, but there is an easier and more efficient way of taking care of this dilema.
As usual, we will need to fire up regedit. Once within that wonderful program, navigate to the following key:
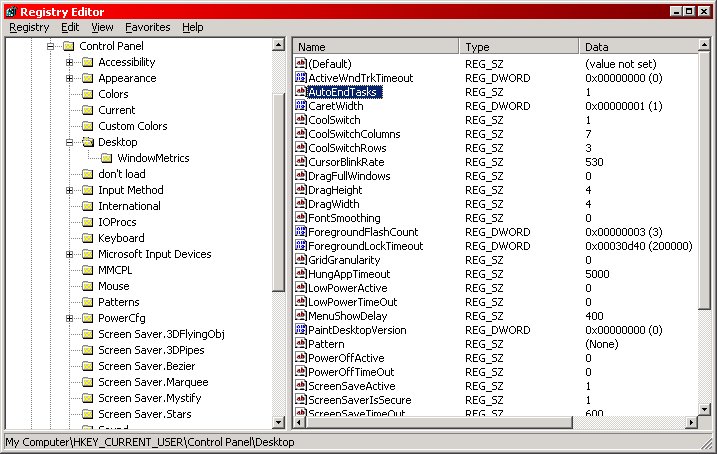
HKEY_CURRENT_USER\Control Panel\Desktop
There should be a string value by the name of AutoEndTasks. If it's not there, create a new string value with that name. In either case, give this string a value of 1, which will enable the 'forced program exit' feature. Easy enough? That's it. After this, you should no longer have to deal with programs refusing to die at shutdown. End-Task Timeout Have you ever had an application freeze up on you and refuse to die? Well, that's the Microsoft world we live in. The usual way to fix this is to ctrl-alt-del and end-task the offending program. However, end-task can sometimes take awhile before realizing that the application is completely hung, during which time you're drumming your fingers waiting for the computer to respond. The following registry tweak will allow you to configure just how long windows waits before it declares an application unresponsive.
Yet again, we must fire up our regedit and navigate to the following key:
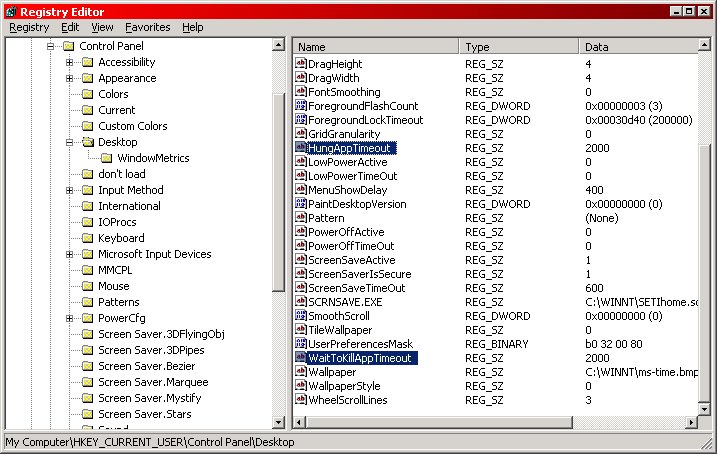
HKEY_CURRENT_USER\Control Panel\Desktop
On the right pane, add the following string value; HungAppTimeout and give it a value of 1000. The default value is 5000. This value is the number of milliseconds before a program is destroyed by using the Task Manager. One thousand milliseconds is, of course, one second.
Additionally, create a new string value by the name of WaitToKillAppTimeout, and give this one a value of 2000. The default value is 20000. Once again, that value is in milliseconds. This is the automatic timeout that windows uses during shutdown/restart. By specifying a smaller value, windows will give applications less time to wrap everything up and close themselves before windows kills the offending applications. Though two seconds may seem like very little time in our world, for a computer it is an age.
Finally, there is one last setting available to control timeouts on system services. In this instance, we need to navigate to the following key:
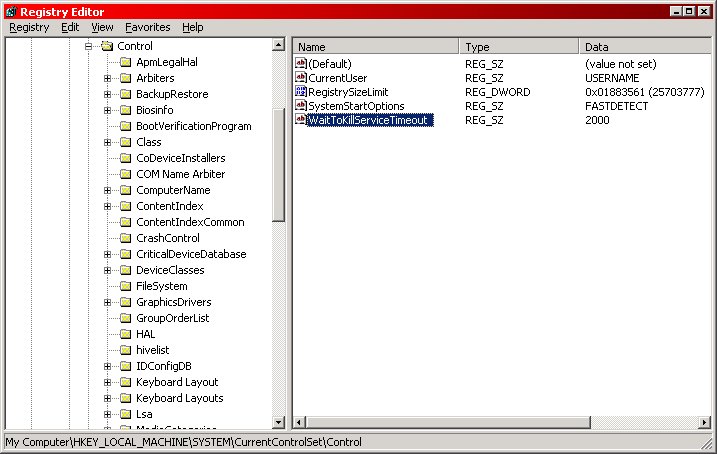
HKEY_LOCAL_MACHINE\SYSTEM\CurrentControlSet\Control
You should find a string value here for WaitToKillServiceTimeout. Change this value to 2000, instead of the 20000 which is default. You will need to restart the computer before any of these changes take effect.
Note of warning...it is technically possible to set all these timeout values as low as 1, or one millisecond. However, it is quite possible that, by doing that, windows will kill applications that are busy, rather than frozen. Please use your better judgement while fiddling with these values. Leaving several seconds leeway should be plenty, unless you have a very old or under-memoried computer. Additionally, if your computer is running any critical applications, such as mail servers, DNS servers, SQL or anything else even mildly important, do NOT change any of these values. MenuShowDelay Have you ever gotten mad at windows for having submenus pop out too slow? Well, with the following tweak you can change the amount of time it takes for menus to automatically pop up when you mouse over them. This may seem like a small deal, but it made a world of difference on my own computer. To implement this, the first thing we'll need to do is open regedit and navigate to the following key:

HKEY_CURRENT_USER\Control Panel\Desktop
Once here, modify or add the following string value: MenuShowDelay. The value of this is the delay between mousing over a menu and the menu actually popping up (such as in start | programs). The default value is 400, though I have mine set at 0. If you're a masochist or messing with someone, you can set the value as high as 65534. You can also set the value to -1 so that a mouse-over NEVER opens a submenu. Instead, you will be forced to click on each menu heading. You will need to reboot before the tweak comes into effect. Window Animation I'm certain everyone is familiar with the funny fading effect displayed in Windows2000 by default, every time you maximize or minimize a program, as well as bring up the start menu. To disable this useless (and cpu-draining) effect, follow the following instructions. First, open regedit and find the following key:
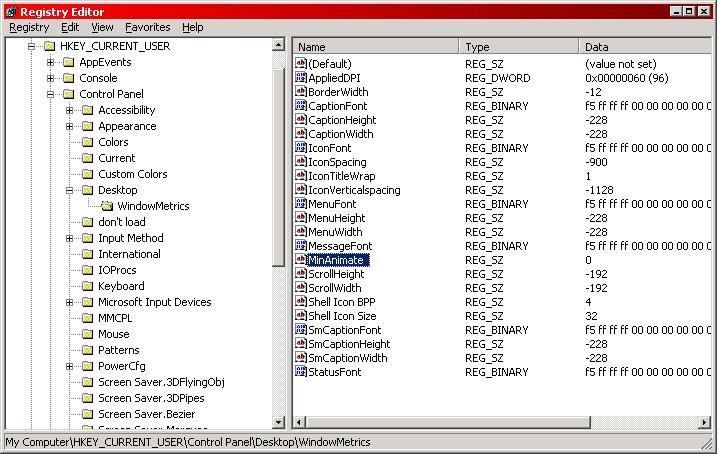
HKEY_CURRENT_USER\Control Panel\Desktop\WindowMetrics
Now, modify or add a string value of MinAnimate and give it a value of 0. Boom, done. You will need to restart the computer, but you should no longer have any window animation. Note that you can also tweak it in the following place, if you are the only user of your computer.
HKEY_USERS\.Default\Control Panel\Desktop\WindowMetrics
As above, simply add the string value MinAnimate with a value of 0. This was another really easy tweak to pull off. Memory Management Tweaks Our next O/S tweak involves tweaking the memory management settings through the registry. These are responsible for setting Windows' memory behaviour, and can be very helpful if you system has sufficient RAM. Please note...if you have 128MB of RAM or less, I would recommend not implementing these tweaks. On the other hand, if you're like me and have 512MB of RAM, please, indulge yourself. Please note that the computer these screenshots were taken on only has 128MB of RAM, so I haven't implemented any of these tweaks.
All of the following tweaks will take place in this registry key:
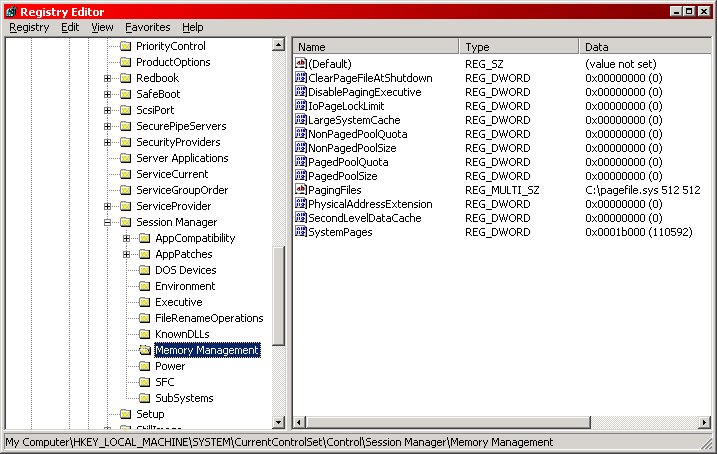
HKEY_LOCAL_MACHINE/System/CurrentControlSet/Control/Session Manager/Memory Management
We are going to be looking at several values within this key, starting with:
DisablePagingExecutive. The default value of this key is 0, but we're going to set it to 1. This will prevent Windows 2000 from paging its Executive Files out of memory, which in turn makes the O/S and programs more responsive. As mentioned above, however, you should be sure to have alot of RAM on your computer before using this tweak.
LargeSystemCache. On all Windows 2000 server platforms, this setting is on by default (which may explain their ungodly memory requirements). What is does is cause the O/S to dedicate all but 4MB of RAM to the file system cache, which in turn allows the computer to cache the OS Kernel to memory. This makes the computer much more responsive. The setting is a dynamic one, so if 4MB is no longer enough to handle program requests, Windows automatically gives up the needed RAM. The default value for this key is 0, though you should set it to 1 if you have enough RAM on your system. Running very intensive applications, such as SQL servers and IIS, is not recommended with this setting turned on.
IOPageLockLimit. The vast majority of people will get very little use out of this tweak, but I found it and it's pretty neat. What it does is tweak the size of the IOPage (duh), which helps when doing a large amount of file transfers or other similar things. As usual, you will need more than 128MB of RAM for this tweak to do much, and in most cases you won't notice a difference in performance unless you're running a server of some sort. The default value of this key is 512KB, whereas the most effective size is somewhere between 8 and 16MB. The value in this key is in bytes, so you will need to multiple your MB value (say, 16MB) times 1024 to get kilobytes, and then again by 1024 to get bytes. For people that are lazy, that comes out to 16777216. That wraps up the memory management tweak. POSIX and OS2 For those of you not in the know, Windows 2000 supports, by default, the POSIX standard, as well as support for OS2 programs. POSIX is an interoperability standard, while OS2 is an old operating system made by IBM. OS2 was actually way ahead of its time, and mainly died because of Bill Gates and IBM's own stupidity, but that's for another time. Regardless, the vast majority of Win2k users have absolutely no need for these subsystems, which in the end only tie up cpu cycles and memory we could be using for something else. So, of course, we're going to remove these basically worthless subsystems.
However, before we can do that, we need to disable windows file protection. Actually, file protection is a pretty neat feature. It basically safeguards all important system files, making sure that some newbie user doesn't inadvertantly overwrite an important system file. However, what we're going to do is actually delete some system files, so we will need to disable the safeguards.
The first step to do that is to open regedit (our friend) and navigate to the following key.
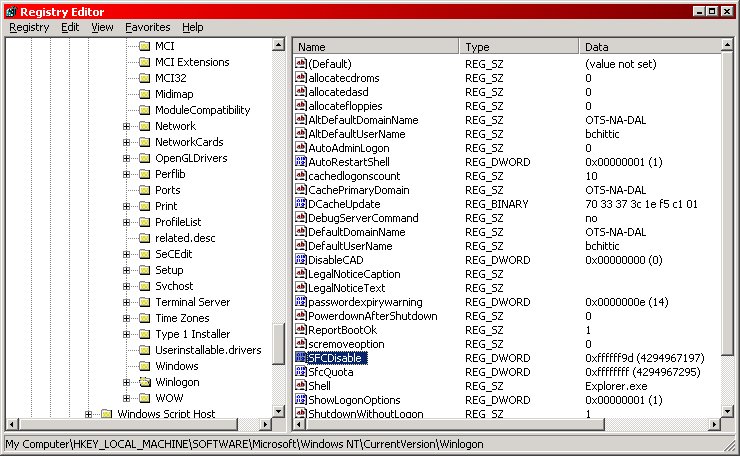
HKEY_LOCAL_MACHINE\Software\Microsoft\Windows NT\CurrentVersion\Winlogon
At this point, either modify or creat the dword SFCDisable, then give it a value of ffffff9d (that's 6 f's). If the key previously existed, it would probably have had a value of 0, which is the default (or on). You will need to reboot.
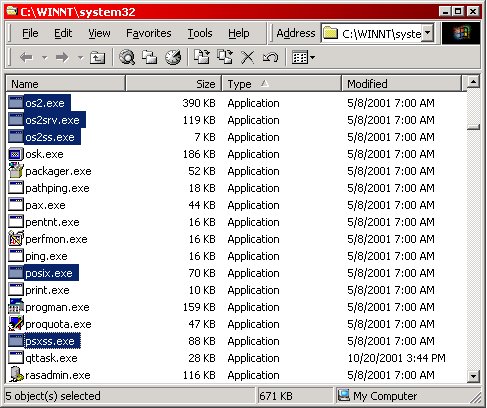
Alright, now to the tweak. Find your system32 directory (usually c:\winnt\system32) and move/rename/delete the following files: OS2.exe, OS2srv.exe, PSXSS.exe OS2ss.exe, and POSIX.exe. Personally I would simply move them out of the folder and throw them somewhere else. That way, if you have an OS2/POSIX program that needed those files, it's pretty easy to undo the changes. And that's it for this tweak. Just remember...if you can't get some program to work, try dropping those files back in and seeing if it makes a difference.
 Removing Windows Components This tweak will involve removing windows component that you wouldn't ordinarily be allowed to remove. This tweak also works for WinXP, in case any of you people are reading this. This is actually one of the easiest tweaks on here.
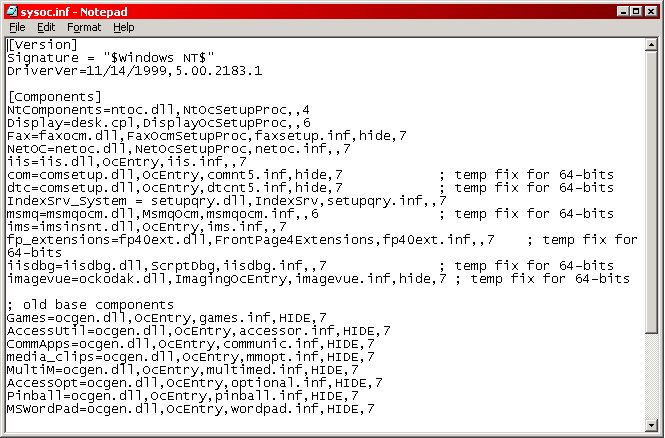
The first thing you'll need to do is find the sysoc.inf file, which should reside in your inf folder (usually c:\winnt\inf). Open it in notepad, and you should be confronted with a long list of stuff. Note everything that has 'HIDE' next to it. Simply delete the word HIDE, being very careful to preserve all commas and such. Do this for every program that has a HIDE next to it. Once you're done (and didn't delete too much), save the file. Next, go to the add/remove programs applet, and your windows setup tab should have considerably more options. Easy tweak.
Ever played with those memory defragmentation programs in win98? Well, this tweak describes how to accomplish something similar in win2k. In reality, memory defragmentation is not what it sounds like...it is, in fact, a memory dump that forces the O/S to empty RAM into the page file and then reload everything again. This helps to eliminate the effects of memory leaks, as well as clear out various detritus. It certainly sounds impressive, but the tweak is surprisingly easy to do.
Open up notepad, and type in the following line.

Mystring = Space(16000000)
then save the file with a .vbs extension...ie, mem.vbs. You will need to have the VB runtime libraries installed, but seeing as these are installed on win2k by default, that shouldn't be much of a problem. By doubleclicking on this vbs file, you will, in effect, flush your system memory. According to the original author of this idea (long lost in mind and space), higher values should be used if you have more RAM. Supposedly values as high as 80000000 have worked with no negative consequences. So, this tweak can be tweaked with. DOS name completion Welcome to our final tweak. I left this particular one for the end because I realize that the vast majority of people no longer use DOS. This is really a shame...I use the hell out of DOS. It's considerably faster doing most file manipulation in DOS then it is in an explorer window. It also puts you more in touch with your logical disk structure...but I digress. What this tweak does is allow an almost linux-like command line autocompletion...one of the things that I picked up from Linux that I can't live without. I didn't even realize it was an option until I found this tweak. Here's what to do:
The default keys to hit to do an autocomplete are ctrl-d (for directories) and ctrl-f (for files), assuming autocomplete is turned on int he first place. The command to turn it on is:
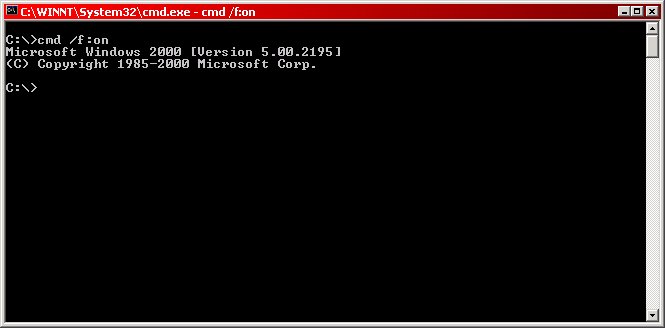
CMD /F:ON
which will enable it for the remainder of that DOS sessions. To make it always turn on, you could put this into a cmd shortcut.
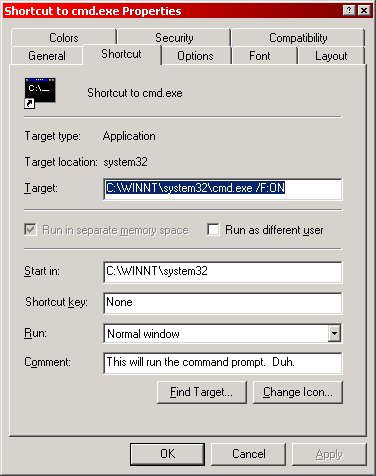
Turning autocompletion on
What we're going to do is change the default hotkey. Open regedit and, if you only want the effect for the current user, navigate to the following key:
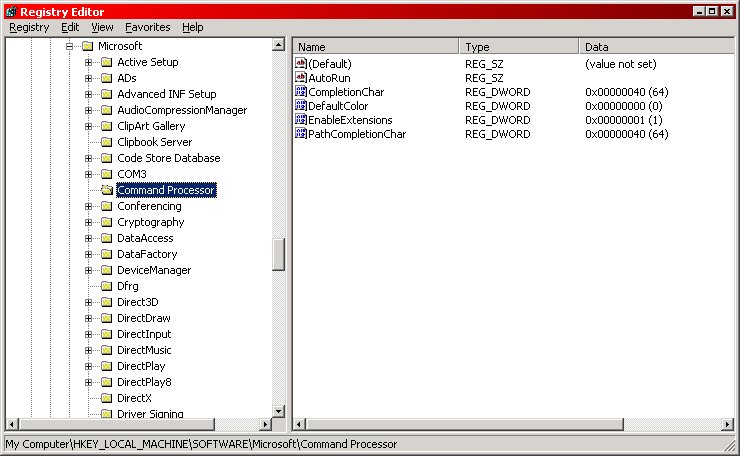
HKEY_CURRENT_USER\Software\Microsoft\Command Processor
If you wish to enable this for all users, you will also need to go here:
HKEY_LOCAL_MACHINE\Software\Microsoft\Command Processor
There are two dwords we will need to modify/create. If you're modifying both of the above keys, you will need to put both dwords in both places (duh).
| CompletionChar | file completion hotkey | | PathCompletionChar | directory completion hotkey |
The default values are 0x4 (or ctrl-d) and 0x6 (or ctrl-f). Setting the value to 0 turns it off, though any other value can assign it to any other key. For those people that are lost, the valid ranges are 0x1 through 0x1F, and are the hexadecimal ASCII values for the keys. For instance, you could set it as 0x9 for the tab key, thus making it just like linux.
When using the hotkeys, hitting the hotkey once will autocomplete with the first match. You can hit it again to go onto the next match. For instance, let's say you typed 'd' at the command prompt, and you hit ctrl-f to match a file. First it may come up with dav.vxd, then hitting it again would display dslvr.exe. |


