


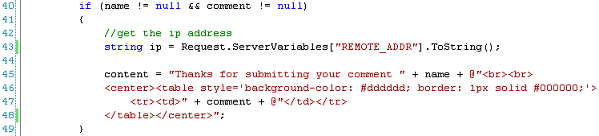
Get the Ip
All I've done here is create a string called ip and set it equal to Request.ServerVariables["REMOTE_ADDR"].ToString(). This is a built-in method within C#. It just returns the ip address of the user.
Accessing the Database 9 May 2008 @ 09:21AM Updated: 25 Jan 2010 @ 09:22AM Now that our table is set up, let's go ahead and do some database access. Bring back your Visual Web Developer 2008 IDE and let's do some work on the form() method. We're going to take the name and comment that the user submitted, get their IP address, and insert all that goodness into our database. Let's begin by getting their ip address. Get the Ip All I've done here is create a string called ip and set it equal to Request.ServerVariables["REMOTE_ADDR"].ToString(). This is a built-in method within C#. It just returns the ip address of the user. Comments (0) With the ip address in our possession, it's time to set up our connection to the database. To begin, at the top of the page you'll notice a bunch of lines that begin with the word "using". Add a line in there that reads using System.Data.OleDb. We're going to use OleDb to access the database. Adding the using line gives us access to all the built-in OleDb methods that C# has. In a previous tut we deleted all the rest of the using statements. We'll keep them all in this tutorial, even though we won't actually be using them all. Below we have the database access code. 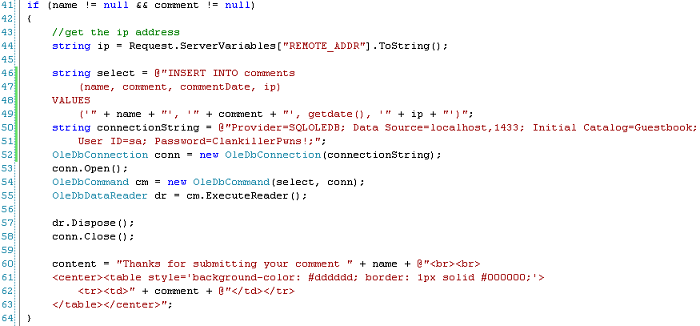 Inserting Data There's a lot going on here. First, on line 46 we begin defining our insert statement. We create a string variable called select and make it equal to a SQL insert. If you know SQL, this is just a basic insert statements. This isn't a SQL tutorial so I'm not going to dissect it. On line 50 I define another string called connectionString. This is a string used to connect to our SQL server. For a list of various connection strings, check out this very informative site: connectionstrings.com. You'll see my data source (the server name, basically) is localhost, 1433. This means I'm connecting to localhost (the local computer) on port 1433. The initial catalog is Guestbook. This is the database on this machine I'm connecting to. The userid is sa and the password is the password I set for that account. You may wonder why it's set to localhost. In this case our sql server and web server is on the same computer, so that works fine. When a user connects to the web server to pull a web page, the web server connect to the SQL server to get data. The user never connects directly to the SQL server. If your SQL server were on a different computer from the web server, instead of localhost you'd need the ip or hostname of the SQL server. On the next line I create an OleDbConnection object called conn and set it to be a new OleDbConnection. I pass the connectionString into this. Just like I created a string earlier by using string ip = ..., I created an OleDbConnection call conn using OleDbConnection conn = new OleDbConnection(connectionString);. This method allows me to pass in connectionString to tell OleDbConnection what to connect to. If you're not too clear on this part, don't worry. Just be aware that you need to do this to establish a database connection. As your knowledge of C# improves things like this will start to make more sense. On line 53 I do conn.Open(). Remember on line 52 we defined conn as being the connection to the database. By using conn.Open(), we're opening the connection. Next on line 54 we're creating a new OleDbCommand called cm. To this we're passing the variables select (which is our insert statement) and conn (which is our database connection). This basically takes our insert statement we defined above and matches it up with our database connection. On line 55 we create another new object, this one is an OleDbDataReader object called dr. This is created by taking our OleDbCommand object (cm) and using the ExecuteReader() method. This basically causes our SQL statement to be executed. On line 57 we then take our OleDbDataReader object and dispose of it (basically flush the memory usage) and finally on line 58 we close our database connection. Comments (0) This may seem like a lot, but it's not important you fully understand every portion of this process. The point is that this same process will allow you to execute any SQL statement you want on your database. This in turn allows you to insert rows, select rows, create tables, whatever you want to do to a SQL database. However, the above example is simplified in several ways. In a real implementation, you'd want to take a few extra steps. Comments (0) | |