


| Additional Application Downloads | |
| Notepad++ | Notepad++ is basically a notepad replacement. It will allows us to edit php (and other) code. What makes Notepad++ so great (and indispenable for me) is that it does various very handy things for coding, such as context hightlighting and code folding. Notepad++ is open source. The version I grabbed was the 3.6 Windows installer. You can see it in several of the previous screenshots. |
| PHPMyAdmin | PHPMyAdmin is a PHP driven application to allow a web interface into your MySQL server. Trust me, it's alot easier using this than it is using the MySQL console interface. I downloaded the version 2.8.1 zip. |
Installing Notepad++ is as easy as running the install and following the prompts. You can pretty much get by with just hitting the next button until the installation is finished. From now on, when editing a php file, you can just right-click on the file and choose Open in Notepad++. Alternately, you can set Notepad++ as the default file handler for .php files, but I won't go into that here.
The installation of PHPMyAdmin is not quite so easy, but it's fairly simple as well. You'll want to begin by unzipping the zip file into your htdocs folder. You can rename it to something that's easy to type (like phpmyadmin instead of phpMyAdmin-2.8.1). Once it's in place, manually create a config folder right below your phpmyadmin folder. Next, open up your web browser and browser to 127.0.0.1/phpmyadmin/scripts/setup.php.
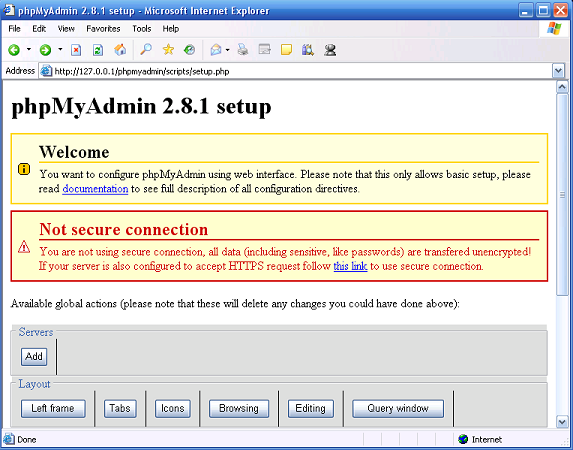
The setup page.
Under the Servers heading, press add to bring up the Configuration window. Here you can leave almost everything blank. Leave the 'User for config auth field' as root. Put your MySQL root password in the 'Password for config auth' field. Now click Add. Next, look down the page to the configuration section. Click the Save button. Look in the config folder we created a minute ago... you'll see a config.inc.php file that was just created for us. Take that file and move it to the phpmyadmin folder (one layer up) and delete the config folder. Now point your browser to just 127.0.0.1/phpmyadmin and you should get a page like below.
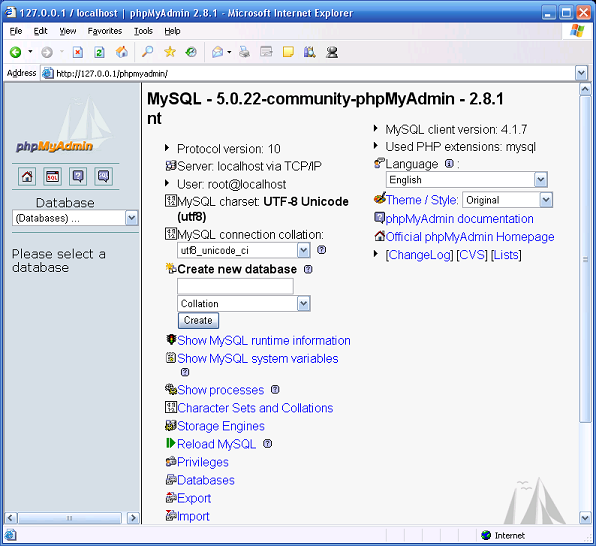
The PHPMyAdmin Front Page
If you see the PHPMyAdmin page as displayed above, you're good to go. Congratulations, you now have all the pieces installed for a WAMP development environment. Amazing, isn't it? And to think you actually considered downloading the all-in-one installers.
A note on configurations
You may be happy that you installed all this, and it's a wonderful thing, but don't think you know it all. All the configurations we've made here are very basic and, in all likelihood, pretty damned insecure. NEVER put this installation online where someone could get at it. This is meant for private useage so you can develop your PHP apps and then upload them to a server that's been properly secured. A good web server administrator's been in the job for years and knows all the configurations of Apache, Mysql, and PHP forwards and backwards.
Additional reading on all these applications can be found online on their respective websites. All three (Apache, MySQL and PHP) have extensive online documentation and huge user communities that have created their own documentation. If you want to learn more, you need not look much further than their online manuals or a quick Google search.
And with that, we have finished the first tutorial. Assuming you've gotten everything up and running properly, you have a full PHP/MySQL development environment. In the future, we'll just start right in and begin with the code.