


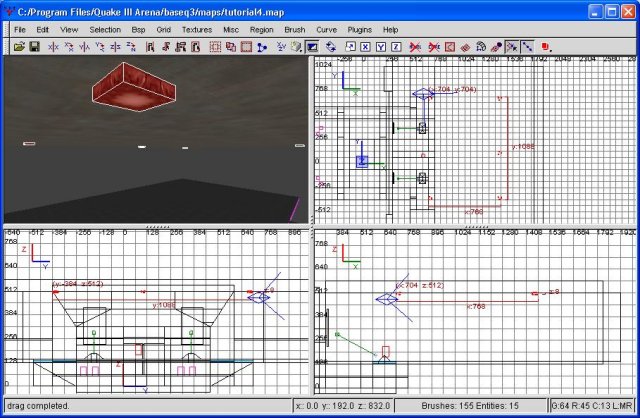
Alright. We still lack lighting. So, I'm going to introduct you to something new...spotlights. First, we're going to make something that looks like a spotlight (since the actual spotlights are invisible). I used the base_light/geolight texture for the light itself. Here's a screenshot of what I made...simple but effective.
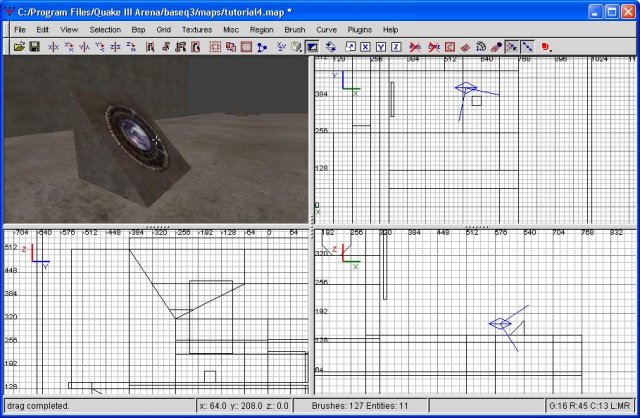
The spotlights
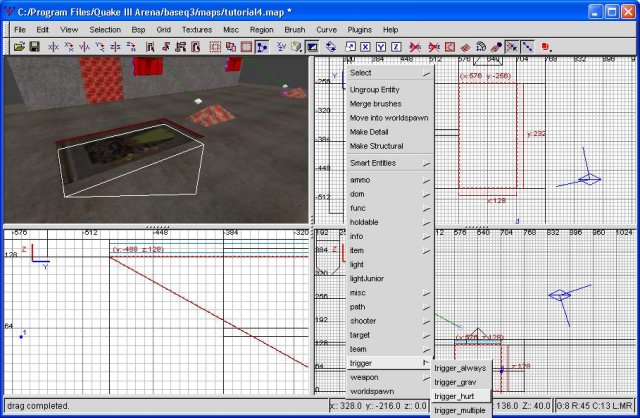
Ok, now for the fun. Right click on the map (any window you prefer, other than the viewfinder) and choose light. Hit ok with a 600 value. Position this so it's close to the spotlight and on a direct line between it and the center of the flag. Next, right click again and choose target, then target_position. Line this up so it's right in front of the center of the flag.
Next, bring up the entity editing window. You should still have the target_position entity selected. Add a key as 'targetname' and the value as 'light1'. Next, select the light and add a key of 'taget' with a value of 'light1'. You should now have a green arrow linking the two entities together. Congratulations, you have created a spotlight.
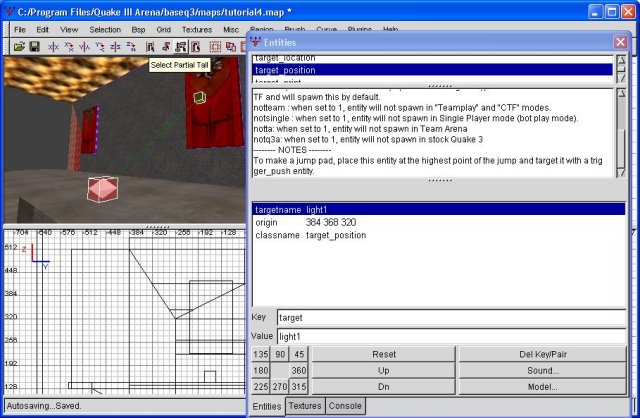
The actual spotlight
Great, with this done, let's clone the whole thing over to the other flag. Select the two entities and the spotlight brush, copy, paste and drag it into position. Now we have two spotlights highlighting our flags, and giving our wall some much-needed light.
The spotlights on the ground are simple but serve a great purpose...the source of some light. However, they're also an impediment. I'm going to make small ramps around them, out of full_clip brushes, in order to help reduce this. You'll still bounce up in the air when running across them, but it's better than being stopped dead-cold on a grapple-jump. Additionally, they're hiding textures that the player will never see...so, fix this with some judicious clipping and caulking. We've been doing enough of this I don't think step-by-step instructions or a screenshot are necessary. Remember...there's always a .map file at the end of the tutorials you can refer to.
Next we're going to expand the flag room to its full size. Prior to doing this, we need to either delete our temporary containment brush, or expand it. I'm going to expand it, just so I can easily recompile the map and see the changes I've made. You can do what you wish, of course. I have a pretty stout computer, so I've expanded the confinement box astronomically so I won't have to mess with it again anytime soon. By making the map so much larger, I'll be increasing compile time by a great deal. If you have an older computer, you may wish to shy away from this procedure.
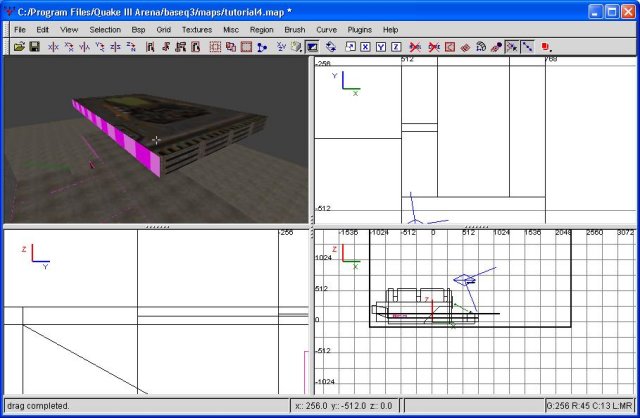
At this point I'm going to enlarge the floor going outward (away from our wall) by a fair amount. Currently the floor area is way too small to function as a flagroom. This is not meant to be a very complex map anyway, so I'm just going to add some floorspace. I'm also going to add some on the sides.
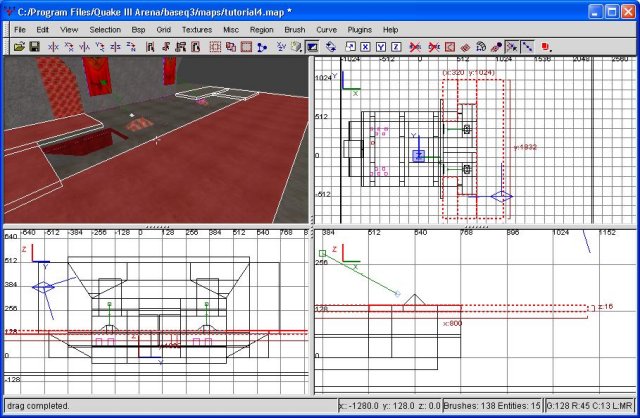
Extending our floor some
Now let's do something a bit more interesting. Those halls leading into the spawn room...at this point in time, what's to keep a lamer from jumping in there and camping in the red spawn room? Nothing. So...let's put in some doors that will only open for the red team.
We'll begin this process by drawing a small brush in the door opening. Be sure not to make it flush with the ground...when the door opens it slides backwards...and if you make it flush, the effect is horrible. Instead, making it a grid unit below ground level. Here's a screenshot.
The door brush
Next, go ahead and texture it with a door texture. The top and bottom, of course, must be textured. Additionally, I'm going to make it so the door slides "north" into the floor...ie, toward the center of the flagroom. Thus, the outer-most side must be textured as well. I realize this may sound a bit confusing, so another screenshot follows. The texture I'm using for the door itself is base_door/c_ggrate8_b. You'll need to use the surface inspector to fit it to the surface. For the edge of the door that will be visible, I'm using base_trim/slots1_1.
The textured door brush (removed from the floor)
Ok, the brush is now done (once I placed it back into its proper position, of course). Now the important part...how do we make it into a door? Easy. Just right click on the background (not the viewfinder) and go to func, then func_door. You MUST have the door brush highlighted for this to work...and ONLY the door brush. After hitting that, any and all selected brushes are now doors. Doors are an entity, so at this point they no longer keep the void at bay. This doesn't matter to us, of course, but it's worth noting.
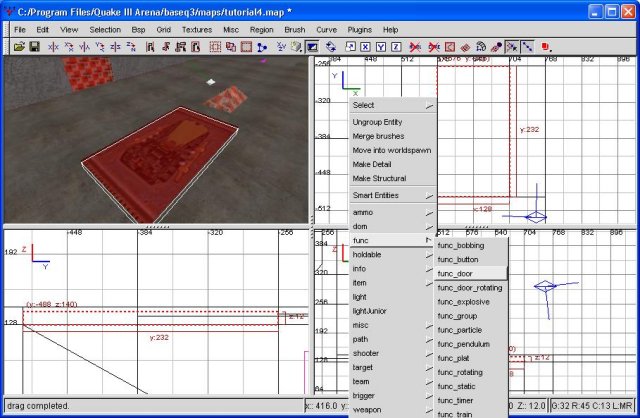
Converting the door brush into a door entity
Bring up the entities window to adjust the properties for our door. The first thing we need to do is hit the '90' in the bottom left of the window. This will add the key 'angle 90' into our properties, which tells the door to open in the direction we want it to. Next, add a line of speed 1000. This determines how quickly the door opens...the default is 100, so 1000 is pretty quick. We don't want it holding anyone up. Finally, add a key of wf_team 1. This makes the door open for only the red team.
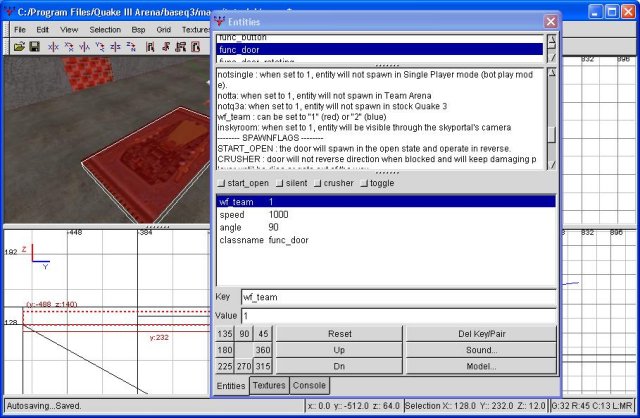
Door properties sheet
And, despite my own explanation, I made the door flush with the bottom of our FR floor brush. Easy enough to correct, of course. It looks good to me, so let's copy, paste, flip and move it into position on the other side, as well. You'll need to realign the textures (surface inspector, fit) because we moved it. Additionally, you'll need to go back into the entity properties and change the door angle to 270. Having done this, let's save it, compile it, and see what we've got.
It appears to be working great. So, we're done with that, right? No. What if the lamer in question is standing ON the door when a red player comes out? Yes...he falls in...and still has possible access to the spawn room. So... what now? How about an entity that instantly kills anyone that's blue? Absolutely.
First, let's draw a brush on our ramp. It's going to fill all the empty space that red team will use to walk up from the spawn room. It need to be of fair size so that network lag and whatnot won't allow someone to teleport through it without getting smacked. Once you've got the brush (properly trimmed so it doesn't intersect any other brushes), open up the common textures and texture it with 'trigger'.
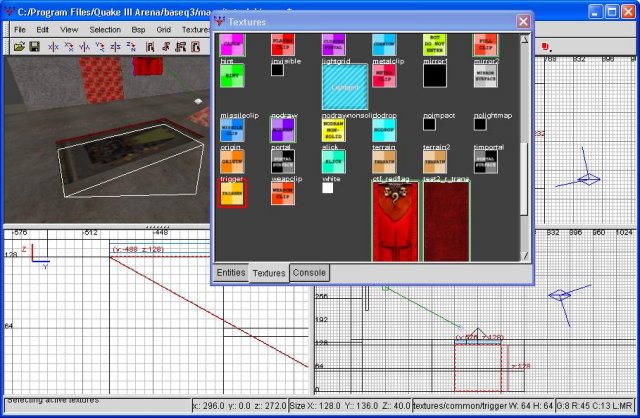
The Killing Brush
Almost there. Next, with the brush highlighted, right click on the background. Choose trigger, then trigger_hurt. You have just converted this brush into a killing entity. We're still going to have to adjust the entity properties, but good work regardless.
Die blue llamas die!
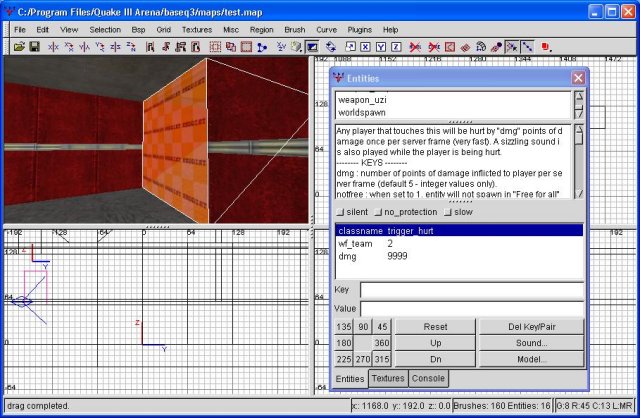
Now go ahead and open up the entity properties for this brush. The first thing we're going to add is 'wf_team 2'. This makes it so only blue team can be injured by this brush. Next, add another key of 'dmg 9999'. This means that every server frame the encroaching blue player takes 9,999 points of damage. Obviously, this is instant death. A very messy instant death, in fact. And that's all we really need.
Instagibs
Go ahead and copy, paste and flip the brush to move it into position. If you'd like to see what it's like to die in this brush, just compile the map and run into it. Since the map runs in deathmatch mode (and regular quake, not wfa) the wf_team key is ignored, thereby insta-gibbing you any time you run into it.
So that we can still explore our level at will, I'm going to move the spawn point out of the spawn room and into the flag room. I've also extended the floor (going away from our one wall) a considerable distance. It is now the size our flag room will be. I've also retextured the floor. If you may have noticed, the floor had a metallic type effect on it... a shader. Unfortuanetly, shaders require extra work from the graphics card, and the flag room will be busy enough as is. Between the flag, defending teammates (two gunners, an engie and a sentry aren't bad guesses), and attacking enemies, there will be plenty to drain video cards of their framerates as is. I'm retexturing it with base_floor/diamond2c instead. Later on, I will present a tutorial that goes indepth on performance issues. For now, take my word for it.
Having done that, let's make the flag room into an actual room. I'm going to add simple walls and a simple ceiling to it. Nothing fancy, at least not yet. I've chosen not to texture our ceiling with a sky texture. This would wash out our spotlight effect. Regardless, everything should now be boxed in, so there's no more need to have our temporarily cube ceiling us off from the void. The void is now held at bay. Delete the outside cube to rid us of that monstrosity.
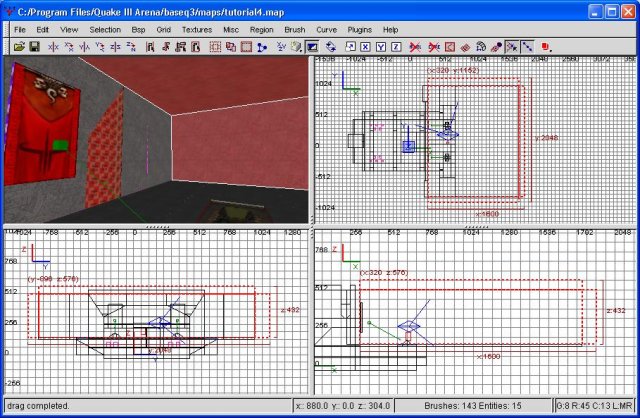
The Flag Room with walls and a ceiling
If you were to compile it now, you'll notice just how incredible dark and dreary our flag room is. In fact, it's so dark that you would be completely unable to see the doors to the spawn room. So...we're going to add some light.
First I'm selecting the portions of our wall near the flags, the outside area. I'm going to cut there horizontally twice, like we did with the spawn room, and I'm going to add some lights to them. Instead of the dull, red lights as before, we're going to add some very bright, white lights. This should help to illuminate at least a portion of our flag room. I've chosen to use the base_light/light5_15k texture. Using the surface inspector, I rotated the texture 90 degrees, then resized it horizontally up to 5. This stretches the texture a bit, and keeps it from being quite as repetitive.
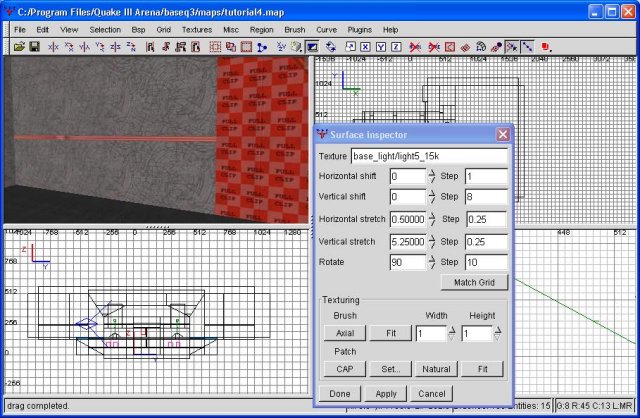
Lighting the flag room, step 1
Though this helps, it by no means alleviates our lighting problem. To continue our work, I'm building small lights into the ceiling. These will be small cubes with a lighting texture built into the bottoms and then affixed to the ceiling. I'll space them regularly and have enough to adequately light our entire flag room. Allow a picture to demonstrate what I mean.
The flag room lights
The sides are base_trim/chrome_border for some variety, while the light itself is base_light/ceil1_38_90k. With the addition of these 5 lights, the flag room is now lit fairly well. I plan on adding some more lights to various things later, but this is more than enough for our purposes. Next, let's add a flag stand.
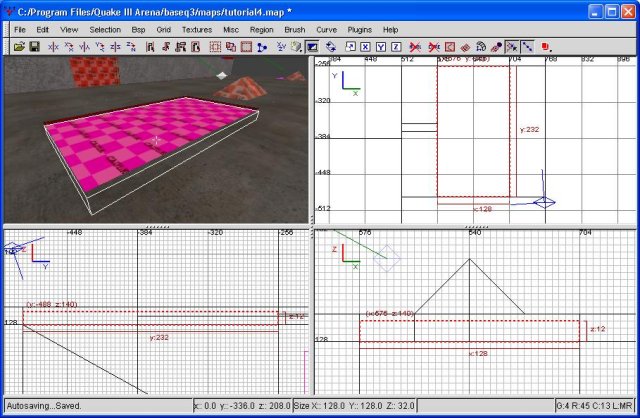
I'm going to begin by adding a square of caulk between our lights and flags, against the back wall of our flag room. I'm making it fairly tall, because we're going to be doing a lot of clipping. Just for the sake of review, here's a nice screenshot of what I'm starting with.
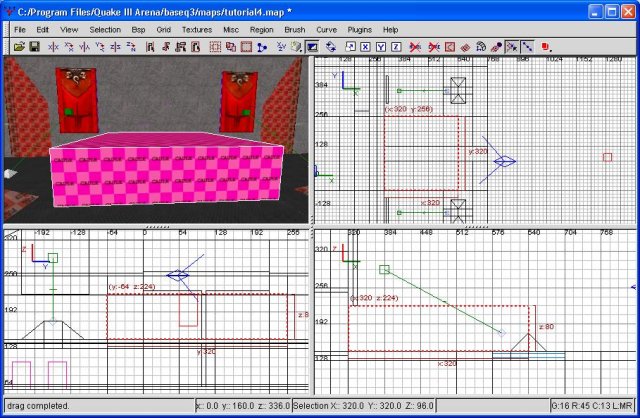
The flagstand
Now I'm going to clip it so that it has an upward ramp from the front. I'm making the ramp very gradual...we don't want to slow down the enemy too much. I'm also going to cut it from the other two sides, but at a steeper angle. This will encourage the opposing team to attack from the front. Having completed that, I'm texturing the whole thing with concrete. Well, just the visible sides, but I'm sure you know what I meant. As always, caulk everything that will never be seen, including the area directly underneath the flag stand. This may require some more clipping and retexturing.
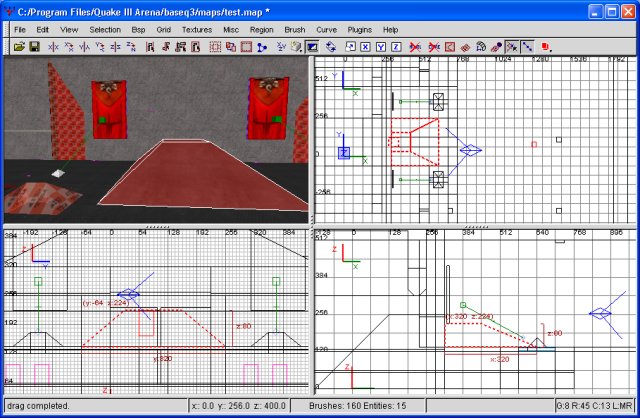
The finished flag stand
Next, the flag itself. Right click on a window and select team, then team_CTF_redflag. Place this on the top of our little flag stand, and voila. We now have a (technically) fully functional flag room. Unfortuanetly, if you compile the map now, you won't see the flag. As mentioned before, gtkradiant automatically launches into deathmatch...and there's no room for a CTF flag in deathmatch. To actually see the flag, you'd have to compile it, then run the map from inside wfa. In order to do this, simply compile the map (tutorial4). Then launch wfa. Pull down the console (~) and type '/sv_pure 0". This sets the server as nonpure, which is necessary until you make a pk3. Then type '/devmap tutorial4'. This would launch the map, and you could look around.
There are a few design considerations to take into consideration here. The most glaring potential problem is the doors to the flagroom. Since we put killing brushes in them, what's to stop a gunner from standing inside the door? This would mean if an enemy inadvertantly dropped into the door, he would instantly die. It would also give the gunner some protection (hull down position, as it were). Well, those are definetely valid considerations. However, it DOES take the gunner a bit away from the flag, keeping the gunner from standing ON the flag. Additionally, once people know the map, they would also know to stay away from the doors. This would restrict passage to the flag to some degree, but a grapple-bunny wouldn't be especially affected, since they have the option to grapple to the ceiling.
Another consideration is the relative lack of height of the ceiling. This pretty much precludes a "balcony" approach, but isn't really much of a problem, either. It also funnels people somewhat and makes it easier for gunners to do their thing. However, due to the relative size of the flag room, I don't think this is too much of an issue. By judiciously placing the entry points to the flag room, I think we can overcome this limitation as well. Remember...nobody likes a turtled map. If a couple defenders can hold down a flagroom indefinetely, the map ceases to be much fun. If the map isn't fun, noone will play it. I think we can overcome all these issues, but it's something to always keep in mind.
The reverse is also true, of course. If the flag room is too open, and too easy for the enemy to snatch the flag, it also becomes no fun. Instead of tactics and teamwork, it's more a matter of who's faster at snatching the flag and capturing it. Everything in a map is balance. We'll get into this considerably more in a future tutorial.
At this point, our basic flag room is complete. Feel free to roam around in it. I'm leaving the remaining eye candy for later, once we've added all the entrances. There's no point in complicating the process by having to cut away alot of excess brushes at a later date.
The map file, for your edification. Tutorial 4 Map