


Now that we've completed all the flag room entrances, it's time to add some detail. You may have noticed that, with the exception of the wall the flag is positioned near, the rest of the flag room is extraordinarily plain. This tutorial will focus on adding some eye candy to the flag room to make it more interesting for all.
The first thing we're going to do is add an actual balcony to the balcony entrance. Currently it's just a hole in a wall. Though this is efficient in-so-far as performance is concerned, it leaves alot to be desired as far as eye candy.
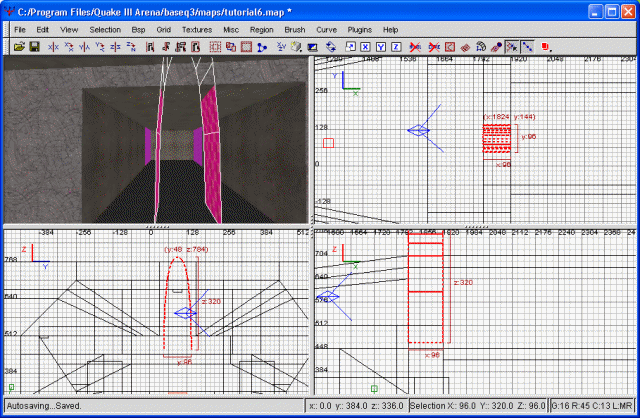
We'll begin by drawing a simple brush to serve as our base balcony. It will extend from the same level as the floor of the balcony hallway. We're also going to extend it a bit further along each side of the entranceway, to give a large platform. Lastly, I'm going to extend the brush down some, and then I'm clipping it at an angle. This last part is a bit difficult to explain in a concise way, so I'll just demonstrate with a screenshot.
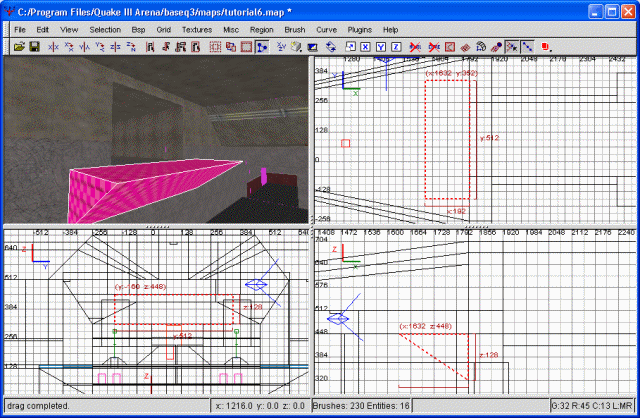
The initial balcony brush
By clipping the balcony like this, we're moving away from the blockiness that the rest of the flag room seems to emphasize. At this point, we could very easily call it quits and just texture everything, but I'm not satisfied with a simple balcony like this.
Instead, we're going to continue by creating another brush. This one will extend from the 'north' edge of the balcony at a downward angle. In doing this, we're breaking up the squareness of the room considerably, as well as adding to the complexity of the overall flag room.
What I'm doing first is drawing the square brush. This will be the same 'width' as the original balcony brush, so that the outward edges line up. It will also extend further down by 64 grid units. Then I'm going to clip it so that it becomes a simple ramp. Before we get to the next portion, I'm going to supply another screenshot so that we're on the same page.
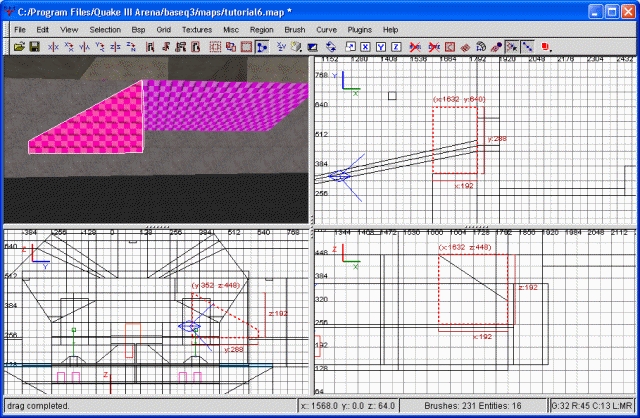
The balcony ramp
Now comes the more difficult part. Using three-point clipping, I'm going to clip the brush again. I'm starting by clipping it (two point) exactly as I clipped the balcony itself. This will preserve the same inward slope as the main balcony has. However, doing just this, you'll notice our ramp shrinks toward the bottom until disappearing. The third clipping point I'm going to position so that this effect does NOT occur. Once more, drag the third clipping point so that the resulting brush echoes what you would like to see. Rather than waste three paragraphs explained precisely what I did, I'll just show another screenshot of what I ended up with.
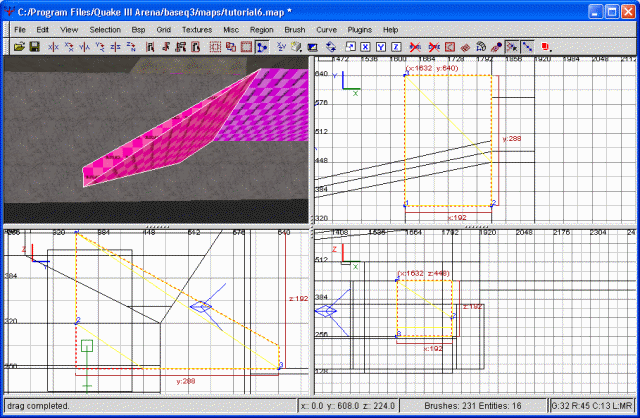
The clipped balcony ramp
Since this isn't PRECISELY what I wanted, I'm going to do another clip. I'm not sure, in fact, if a three-point clip could have actually yielded exactly the shape I was looking for. Regardless, another two-point clip helps to even out the bottom of our ramp. You may have noticed already that end of the ramp (north side) has some thickness to it again. This was on purpose, as I thought that would look interesting. Of course, you can be free to do whatever you want.
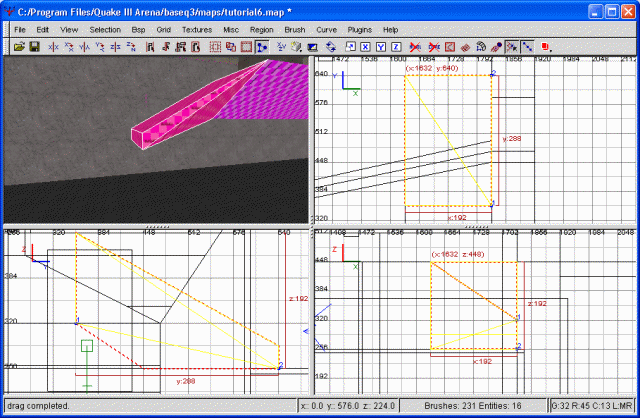
And clipped again
That pretty much does it for this ramp. I'm now going to take our new ramp, copy it, paste it, and then flip it around the y axis. A little bit of scooting, and now we're got the other side of the ramp taken care of. Before we do any more work, let's go ahead and texture the balcony. We'll also need to do some clipping of the wall behind it to eliminate hidden textures.
I won't bore you with the specifics of how to cut and caulk the portions of the wall that are hidden, nor precisely which textures I'm using on the balcony. By now, you should have by far a firm enough grasp on these concepts that you don't need me holding your hand. And, with that our of the way, let's continue.
You may have noticed I didn't extend the balcony ramps entirely to the floor of the flag room. In fact, if you launch the map, you'll notice they come nowhere near enough to the floor to even jump up to, though grapples, rocket jumps and the like will gain you access. Regardless, we need to fabricate some way to allow ground pounders easy access without injuring themselves in the process. Though there are numerous ways to accomplish this, I've decided on using jump pads.
We're going to begin, as usual, with the north side. The first thing we need to do is cut the floor to form a good place for a jump pad texture. This should be a perfect square, unless you have some desire to make it odd-shaped. Regardless, I'm then going to texture it with sfx/bouncepad01_diamond2ctga, which happens to match the texture we already have on the floor. In order to make the textures match up correctly, however, I had to do some creative clipping. In the end I did manage to make it look as it should. By this, I mean that the default size for the bounce pad texture is right, and I didn't want to resize it any. In order to accomplish that, I ended up doing some extra clipping to make everything line up right.
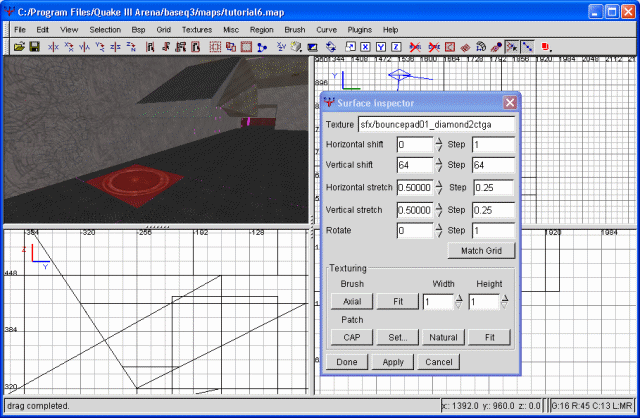
The bounce pad
Unfortuanetly, my luck remains as always (bad). Our floor is a diamond2c floor, as I'm sure you know. Though this floor exists as the background for a jump pad texture, it is also the only jump pad texture that has no shader. As such, the neat little jump pad effect of pulsating light is not present on this one. Well, whatever, the pad itself is all we really want anyway. The shader only helps to add to the complexity of the scene, which, in turn, only slows down the gameplay. So, we have what we want. If you really wanted to, you could retexture the entire floor something else, then use a working jump pad shader. Personally, I'm happy with what we have. Now let's make the rest of the jump pad.
We're going to draw a brush over this pad and texture it with the common/trigger texture. Make the trigger brush a little smaller than the actual jump pad brush. With the trigger brush selected, right-click on any of the windows (besides the viewfinder) and choose trigger/trigger_push. Now we're about halfway there.
Next, we want to create another entity. Deselect your trigger_push, then right-click and choose target/target_position. The target_position will be what the bouncepad aims at. It will also be the highest point in the jump. Position this entity accordingly, such that anyone hitting the bounce pad will land on our balcony ramp. Next, give your target_position a key of 'targetname bounce1'. Then select your trigger_push and give it a key of 'target bounce1'. This links the two entities together. Congratulations, we now have a bounce pad. Compile the map and test it out. If the pad doesn't bounce you exactly where you want it to, move the target_position entity.
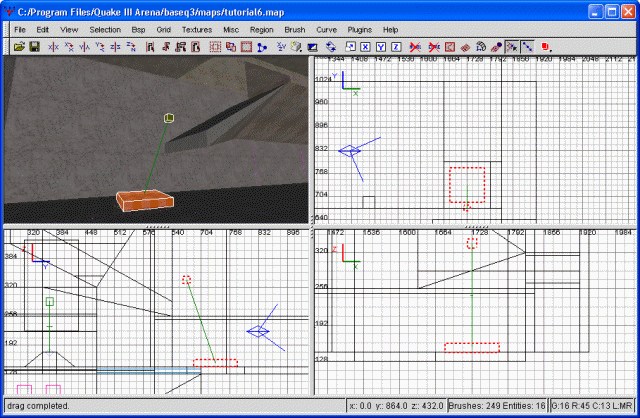
The bounce pad completed
Now let's just copy this procedure to the other side of the ramp. I think we covered this pretty well, so I'm not going to insult your intelligence by going over the whole thing again.
Excellent. With that done, it's time to add more detail to the flag room. I'm going to begin with the wall opposite our flag, the same on that holds our balcony. To begin with, the wall itself is textured with base_floor/metaltechfloor01final, while the top patch (surrounding the doorway) is textured with base_wall/patch10. Let's go ahead and just texture the whole mess with the prior texture.
With that done, let's make our balcony doorway arched. This should help break up the bockiness of everything significantly. We'll begin by drawing a simple brush occupying the space we want our arch in. Next, select curve, then end-cap. You may notice this is not at all what we want, mainly because the orientation is wrong.
We'll need to rotate the resulting curve along the z axis, then rotate it 270 degrees in on the y axis. Following that, you'll need to resize it again so that it fits in the doorway. Since this kind of confused me the first time I did it, I'm going to follow with a pictorial showing it all, bit by bit.
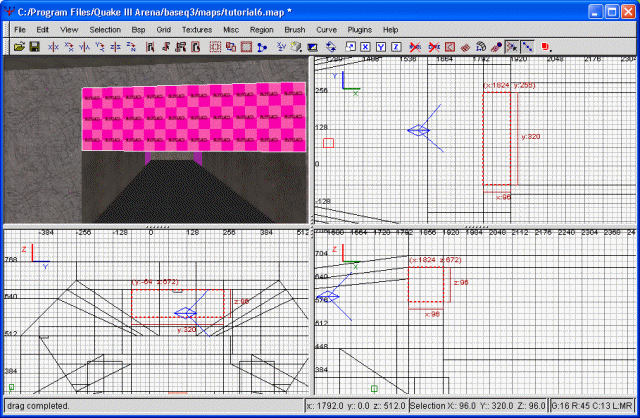
Draw the original brush

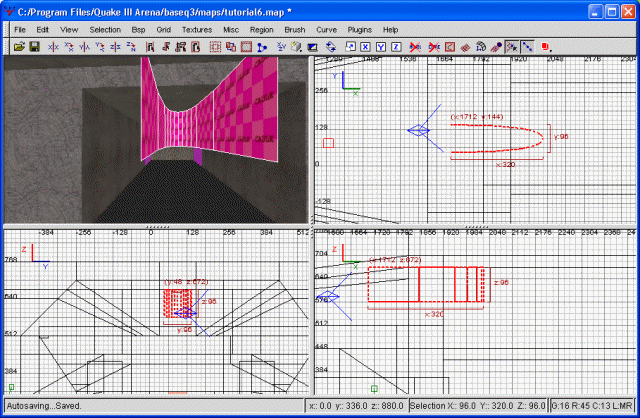
Choose curve, endcap
rotate the z axis
rotate the y axis 270 degrees
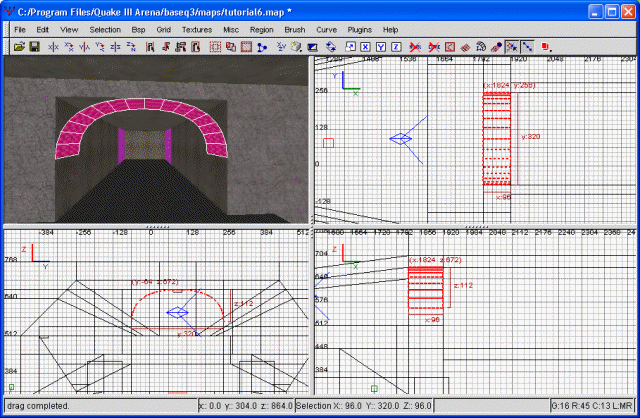
resize the brush to fit our hallway
I hope that helped. Of course, we're still not done, since we only have the curve right now. If you'll notice, there are holes between the walls and the actual curve. The way we fill that in follows.