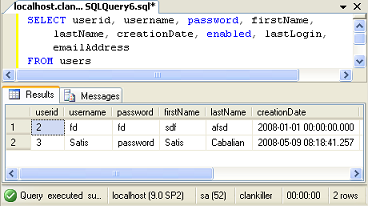
Basic SQL - SELECT
13 May 2009 @ 11:00AM

Updated: 29 Jul 2010 @ 12:06PM
The SELECT statement is something you'll probably end up using more than an INSERT statement. Additionally, you'll end up using significantly more complex SELECT statements than INSERTs. For the most part, all my INSERTs follow the form on the previous page, with a few rare execptions. SELECT, however, is a whole different animal. We'll start with a basic SELECT.


A Simple SELECT

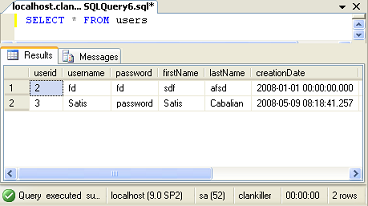
The select is SELECT * FROM users. This means I'm selecting everything (*) from the users table. Pretty straight forward. Beneath the query you can see the results. Further below you can see the time it took to execute the query (the window cuts it off in my screenshot though), the server, the version, the user I'm logged in as, the database and the number of rows retured. Easy, right? It's also bad form.

When pulling database results in a web application using OleDbDataReader, you have to reference your columns by their number. IE, for this query, in order to reference the lastName field, I would use dr.GetValue(4). You may be wondering "so what?". Well, what happens if I add a new column to this table, say a middle name column, and I place it between firstName and lastName? Suddenly dr.GetValue(4) isn't the last name any more. It's the middle name. And you just broke your web application.

edit 29July2010: Please note that you do NOT have to us dr.GetValue(#) to retrieve a column value. You can also pull a column via dr["columnName"]. This would bypass the whole problem with numbered columns, as well as make it easier to go back and read your code. However, you still shouldn't use a splat(*). Always select only the fields you need by manually specifying the column names. Even if you really want all fields from the table, specify the field names anyway.
Comments (0)
So what's the fix? Well, you never use the splat (*) to query a table. Query the specific columns you want to see. Below is the same query, but without the asterisk.


A Better SELECT

This gets the exact same results as the above query, but if someone sticks another column in there somewhere, I still get only these exact results. Now the select will always work, unless someone deletes a column or deletes the whole table. If that happens, you have bigger problems than your SELECT statement failing.

This query allows us to get all data out of the users table, but in reality you'll rarely just grab all data in a table. Instead you'll want to grab specific types of data. Allow me to introduce you to the WHERE clause.
Comments (0)

The WHERE Clause

The first thing you may notice is that I'm now selecting just the emailAddress, firstName and lastName fields. I may do something like this to feed a mailing list, for instance. However, the part we're more interested in is WHERE enabled = 1. In effect, I'm asking for the email, first and last name only for rows where the enabled column is 1. Users that are disabled (enabled =0) would be excluded from this list. That way if I had any users that have been disabled for whatever reason, they wouldn't be getting my mailing.

Let's look at a slightly more complicated WHERE clause.


A More Complicated Where Clause

In this query, I added a second WHERE clause. You can add as many where clauses as you want. In this case I used AND, so any rows that are returned must have enabled = 1 and also have a firstName like 'Sat%'. The like keyword lets you do a partial comparison. Here I'm asking for 'Sat%'. The percentage sign (%) is a wildcard. I'm basically asking for any row that has a firstName that starts with the letters Sat. For the next example we'll get a bit more complicated. I'm adding some more rows in the table (not demonstrated in the tutorial) just so we can get more results.


An Even More Complex Where Clause... Plus Order

We'll start with the WHERE statement. Here I'm looking for accounts that are enabled=1. Then I have an OR and parenthesis. That means either enabled=1 or whatever's in the parenthesis. In there we're checking if the lastName like '%clinton' and the emailAddress is like '%@theclintons%'. In effect, anyone that has their account enabled is returned. Additionally, anyone that has a last name that ends in clinton and an email address that has @theclintons somewhere in it is returned.

You can keeping adding and grouping WHERE clauses as much as you want. We'll get into more advanced options later. Following the WHERE clause we have the ORDER BY clause. This tells SQL in what order to return the results. I'm ordering the results by lastName in an ASCending fashion. Yes, ASC stands for ascending. I'm then also ordering the results by the firstname in a DESCending fashion. So basically for any results that have the same lastName, it then orders these results by the firstName. You can see that we have three Clintons, so we then suborder the clintons based on their first name in a reverse-alphabetical order.

This was a pretty quick run down of simple select statements. They can get much, much more complicated. We'll go over some of that later. I recommend you play around with SELECT if you're having any doubts. It'll only get more complicated as we keep going. Next, we update our rows.
Comments (0)