


The newly-textured rafters
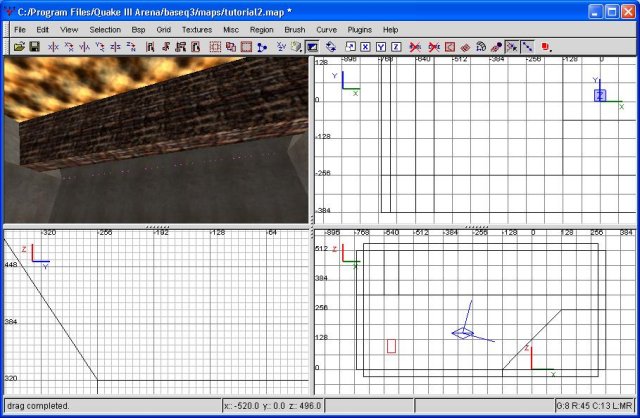
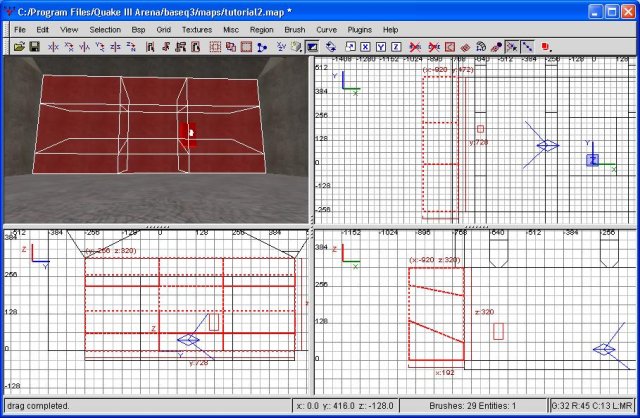
Next I'm going to make the rafters look a bit more interesting. We're going to cut the brush so that it's less rectangular. The following may be confusing. Please refer to the screenshot below for clarification. First, I'm cutting it horizontally, a couply gridlines up from the bottom. Then I'm going to cut it, twice, vertically. Lastly, I'm going to use the front view to clip the rafters at an angle from the side. A picture is worth a thousand words.
The newly-cut rafters
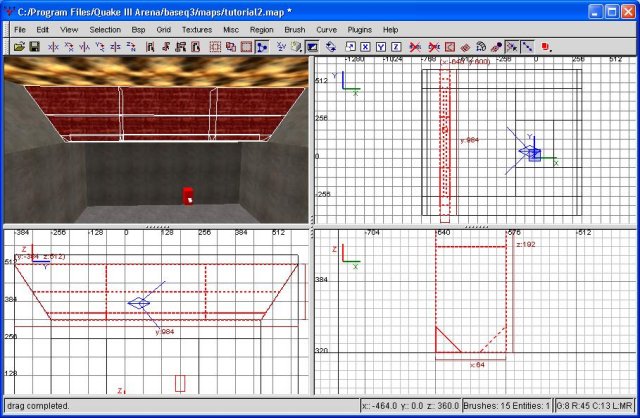
First, the portion we cut at an angle (the last instruction above). Let's go ahead and delete the smaller portion of this. I'm also deleting the center, buttom brush left over from our other cutting. Finally, I'm going to clip the remaining two brushes at an angle, making them slant upward as they intersect with the main rafter trunk. Sound confusing enough? Allow me to introduce you to another screenshot.
Making the rafters a bit more interesting
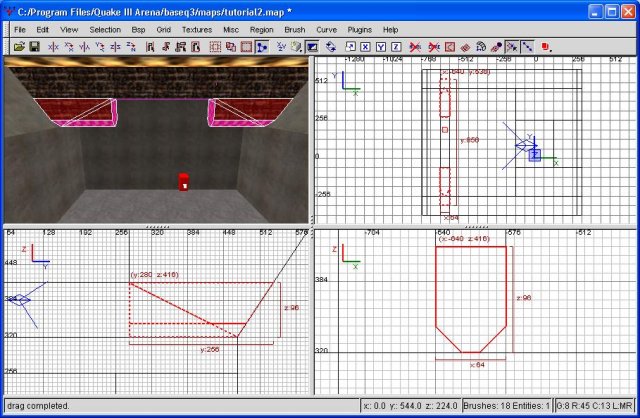
I'm deleting the bottom portion of these clips. Now we've got something that at least appears a bit more interesting than the boxy rafters we started out with. Does it look good? Not really. However, I'm more interested in covering basic skills than making an award-winning map. Go ahead and retexture all the caulk that's showing with our rafter texture.
Alright, good work. Next, highlight our rafters (all five brushes), and hit ctrl-c to copy them. Ctrl-v will paste it, and let's drag it down a bit. I've decided to make a total of three of these rafters and space them about equally across the ceiling, as the screenshot below should demonstrate.
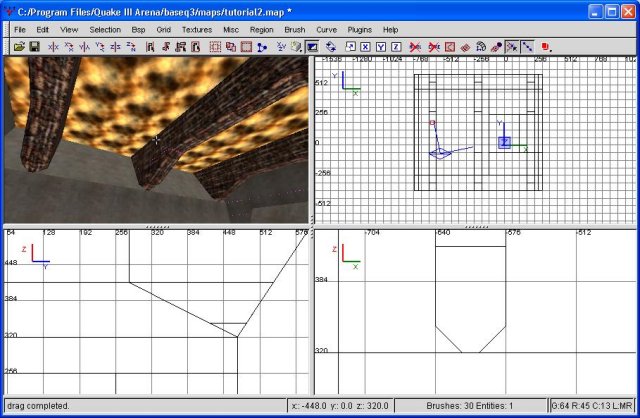
Copying the rafters
Alright. Let's go ahead and save our map again, then compile it and have a look at our handiwork. It looks alot better in there, especially with the shadows those rafters throw.
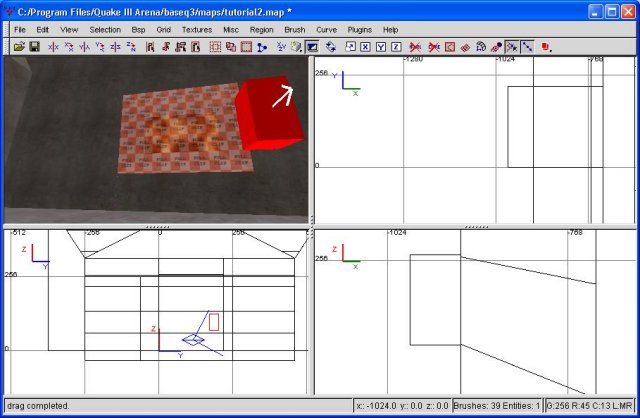
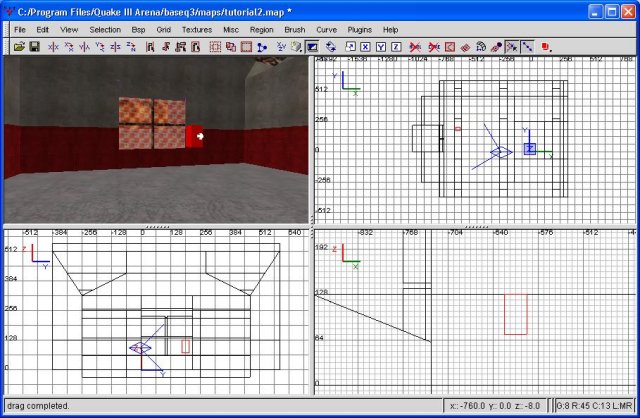
Next we're going to do something with our back wall. It looks awfully plain the way it is, so we're going to add a window. We'll begin by expanding the large portion of the bottom brush out; I want the window to have some serious depth. So, first I'll highlight the brush, then expand it out using the top view (top right window). Then I'm going to use the clipping tool to cut it, first vertically around where I'm going to make the window. Due to the fact our room really isn't laid out by grid, I'm just making it roughly approximate. Honestly, I don't think it makes much difference either way, but if you want it to be perfectly symmetrical you could.
In order to make the window a bit more interesting, and with the side brushes still selected, I'm going to cut it at an angle. There's also another reason for this, but we'll get into that in a moment. When I'm done, the following is what I've got left.
Cutting the window
I've left all the brushes selected, to make it easier to tell what I did. I also left the center brush (the one that will be the actual window hole) for another reason. Keep reading to figure out why. Regardless, I'm deselecting everything, then selecting that centermost brush. I'm then putting my grid setting to 9 and scooting it away into the void somewhere. We'll need it later. Set your grid number back to a more normal setting (4 works) and we'll keep going.
First I'm texturing the inside of the window frame. I'll be using the concrete setting again to keep things simple. With that done, I'm going to draw a new brush across the opening at the end of our window, thereby sealing us off from the void once more. Be sure to texture it with caulk (you can just select caulk before drawing it, if you like). Then, select the face that's visible and texture it with our sky texture (hellsky2bright). You may have noticed by now that any texture we've already used has a green border around it. This is quite helpful, especially when you have a large array of similar-looking textures.
Next, reselect that brush we have floating in the void. Change your grid-size back to 9, and now we're going to texture it with a 'common' texture. We're going to use the 'full_clip' texture. When you texture it, the brush may disappear. Have no fear, just hit Alt-7, or alternately go to view, then filter, then click on 'clips', which will probably be depressed. Now the brush should reappear. Go ahead and drag it back into the place where it originated.
Full-clipping the window
What fullclip does is prevent people from going there. It acts like a brush, but is completely invisible. However, it doesn't stop weaponsfire. This should keep our intrepid players from venturing into the window frame. Why? Try moving the brush out and compiling the map, then jumping into there. The problem is the sky texture. When viewed from a downward angle, it produces the infamous Hall of Mirrors effect (HOM for short). Any texture that has the "moving clouds" shader effect will have this problem. This effect is something to be avoided at all costs.
Now, there's no need for the full brush to be in here. You can go ahead and cut it so only the front-most portion is left. However, leave enough...internet lag conditions, coupled with extreme player speeds (ie, grapple slings and rocket jumps) can make it possible to basically teleport through a brush. This is important for all your special brushes, most especially damage brushes you may put up to keep someone out of the opposing team's spawn room.
Regardless, let's put some crossbeams on the window. It's just a hole right now. By adding some more detail, we can make it look a bit cooler.
We already went over in-depth about not overlapping textures, or putting textures where they can't be seen. Another important thing is to not overlap brushes. We could very easily just draw a new brush inside our full_clip brush, but that's not a good idea. Instead, just clip the full_clip brush (using the clipping tool, of course) in order to leave yourself with some nice-looking window detail.
In this case, I clipped a bar both horizontally and vertically. I also cut off the depth on it a great deal...making it too thick will make it look pretty dumb. In doing this, as well, I made it so the back of these brushes is caulked. Noone will ever see the back, so this is perfect.
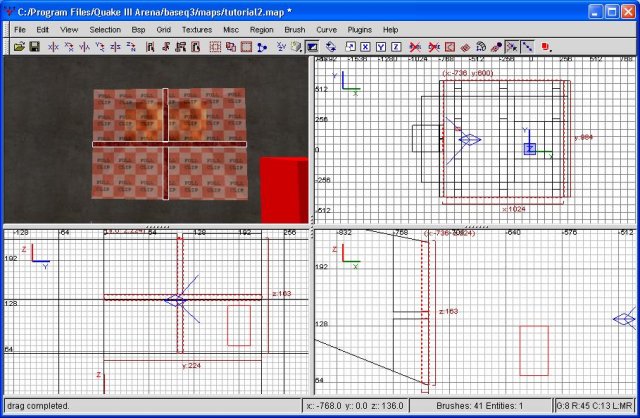
The finished window
That should be all we need to do with this window. Now let's do some cleaning up. Remember the rafters we made? Well, they're flush with the sky, and are therefore blocking some sky textures...ie, textures that will never be seen. Let's fix this with some judicious clipping.
Alright, having done that, let's go ahead and add some stuff to the walls. I've decided this will be the red spawn room, so we need to make that obvious. I have personally forgotten what team I was on, so coloring the spawn room definetely helps. We're going to first select all the walls that are about eye height. I'll go ahead and demonstrate.
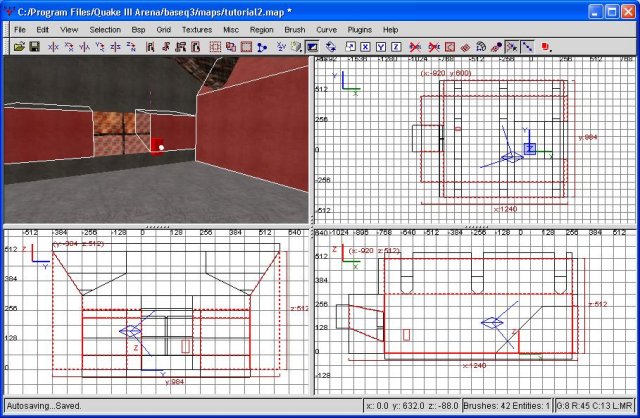
Select these walls
Now we're going to cut them horizontally. The precise height isn't all that important. Now select all the wall faces that are at the cut line or below. This includes the ones below the window and such. We're going to texture this bunch with red to make it a little more obvious what team you're on.
Choose the ctf textures heading, then find test2_r_trans. This is the only all-red texture in here, and as you can see, there's also a blue equivalent. When you're doing stuff like this, remember..there needs to be both red and blue of each. Of course, if you're going to modify textures or make your own, things change a bit. Regardless, go ahead and texture the walls.
Texturing the red
Alrighty... let's go ahead and reselect all the walls directly above the ones we just textured. We're going to add even more variety to our spawn room. Once you've got them all selected, we're cutting it horizontally again, but this time only one grid unit (at a 4 unit setting). Select all the visible faces of this tiny cut we made, and let's texture those.
We're going to use the base, then base_light texture group. Within here, select the 'jaildr1_3' texture. You may notice this is a large, vertical texture. Use the surface inspector (s) to rotate this texture 90 degrees. Now you'll notice it doesn't quite line up right. If you hit done, bring up the surface inspector again and adjust the horizontal shift until the texture fits right. You may be wondering why we're adjusting the horizontal shift, rather than the vertical shift. I don't know. Maybe it has something to do with us rotating the texture. Regardless, that's what needs to be done. I ended up using a value of 7 to get it to fit.
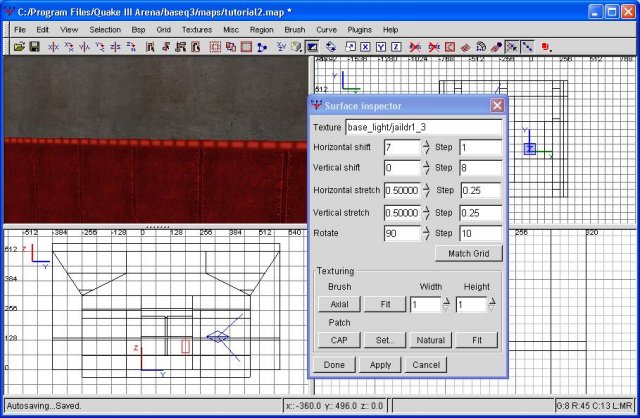
Use the surface inspector to make the texture fit right
So...are we done now? Basically. This spawn room is missing one, very important thing. Ammo packs. No spawn room would be complete without some ammo packs. How do we add these? Glad you asked. Go ahead and right click on your top view, somewhere where there's floor. Next go to item, then item_pack. When you select this, an entity will appear. This is the pack. Put it somewhere you think it should go, then hit 'n'. This brings up the entity window. There'll be a short description of the entity, as well as stuff you can add to change the way the entity behaves. In this case, I'm adding two things.
The first is the wait time. Ordinarily it takes 35 seconds for a pack to respawn. This is an eternity in WFA. Instead, I'm setting it to 1 (or 1 second). Much better. Where it says key, type 'wait', then in value type 1 and hit enter. This will add this value to the entity. Next, I'm adding a wf_team key with a value of 1. This means that only the red team can pick up the pack. Entirely necessary? Probably not, but it doesn't take much time . It's also a good habit to get into.

Making your packs
Alright, you've got your first, generic pack. At this point, with it still highlighted, hit ctrl-c, then ctrl-v to paste it. Let's make a total of 10 packs, 5 on each side in little clusters. You can add more or less if you want, but I'm going with 10 packs total.
Alright, at this point, if you compile the map, quake3 will not show these packs. They are specific to WFA. The only way to get the packs to show up (or anything else purely WFA for that matter) is to actually load WFA up. I'm not going to tell you how to do this yet, as it's a bit early to really start doing this on a regular basis. However, here's what my map looks like in WFA.
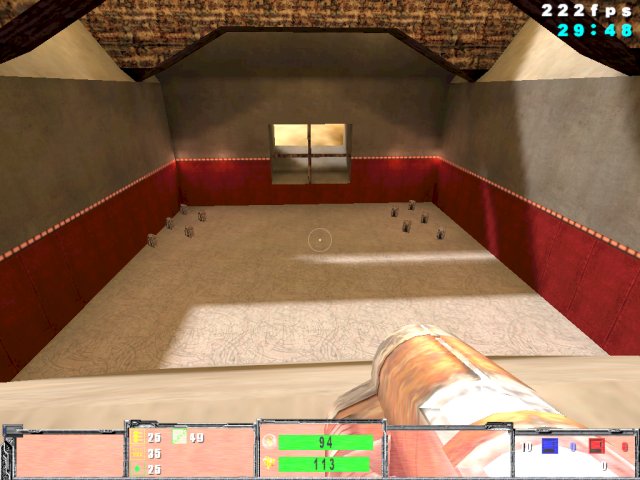
Ain't it pretty?
At this point, we're going to call it a day. You should know enough by now to continue to customize your spawn room to your taste. It still looks quite bare, and I would probably cut up the floor and ramp to add more texture variance. I would also add some small ledge brushes, perhaps just on the window, but more likely around the entire spawn room. This, as I'm sure you can tell, can be a lengthy process. As I said at the start of this all...we're making a simple map, not a good map.
With that, I'd like to offer up a copy of the finished .map file for this tutorial. If you've followed along and would like to see how your own map looks compared to mine, please download it. You may need to right-click it and choose 'save-as'.
The .map file for this tutorial
Once you've got it unzipped, you'll need to place it in your Quake3 map directory. The default is 'c:\program files\quake iii arena\baseq3\maps'. Alter that as necessary, in case you have a nonstandard installation.