


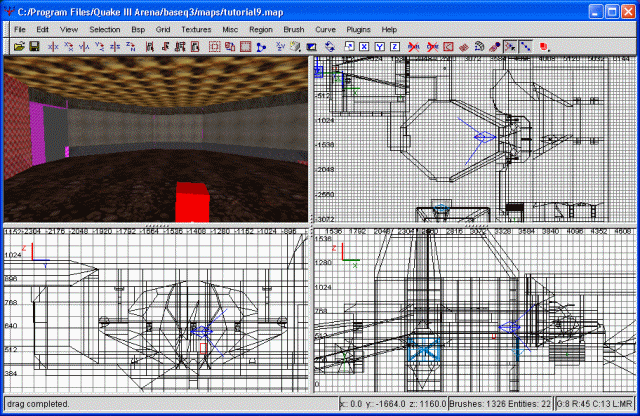
With the door done, we're going to create our shaft. We already have rough walls, ceiling and floor completed, so I'm just going to scoot these out and enlarge them to increase the size of the shaft. At this point, it's come to my attention that the passage from our courtyard is very close at hand, so in an effort to expedite their eventual meeting I'm going to design my shaft accordingly. The following screenshot should give a good indication of where I'm heading with this.
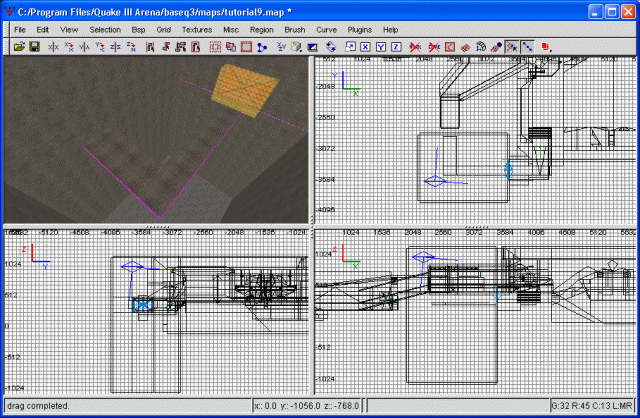
SHAFT!
Ignore the fact that it's currently rather drab and unattractive. All that will change shortly. But first let's do some more ground work. Notice how the shaft goes really deep? My thoughts are that we make it so that people that fall instantly die. I've begun that by making it rather deep, but it's going to take more than that to instagib someone. And hey, while we're at it, why not make them scream, also?
Just for the astute ones, precisely what we are doing is actually covered in the gtkradiant manual. Still, we'll go over it again. The first thing we need to do is draw a trigger brush. We'll do this at the depth we want someone to explode at. Make sure the brush extends across the entire shaft, and also make it's thick enough so noone can lag through it.
Once you've drawn it out and textured it with the trigger texture, right click on the grid area and choose trigger/trigger_hurt. Next, go into the entity properties. Click on the silent button (this supposedly turns off the hissing noise usually associated with hurt brushes) and then add a key of dmg, with a value of 9999. That's how many points of damage per server frame is dealt out to the player. It doesn't matter who you are, you're going to be insta-gibbed by that much damage.
Ok, we're partway there. With the hurt brush finished, let's make the player scream. Directly above this brush, draw out another, similar brush. Once more, texture it with the trigger texture. Next, convert it to a trigger_multiple. When the player passes through this brush this will trigger the scream. The final part of this is the speaker. Deselect our trigger_multiple brush, then right-click on the background and choose target/target_speaker. This will play our death scream. Link the trigger_multiple and the speaker together. There are actually two ways of doing this. We can do it as above, by providing a target value to the trigger and a targetname value to the speaker. Alternately, you can select the trigger_multiple, then select the speaker, and hit ctrl-k. This automatically provides the necessary keys and is easier than the traditional method. However, if you're doing a complex set of triggers, I highly recommend you name them yourself. This should hopefully cut down on potential confusion.
Now select the target_speak entity and go into the entity properties window. Add a key of noise, with a value of *falling1.wav. The noise key tells the speaker what wav file to play, while the * says to play the file in your current model's folder. IE, if you're an arsonist, it will play the arsonist version of falling1.wav, while if you're a sniper it will play the sniper's version. Next do a compile and see how things turned out.
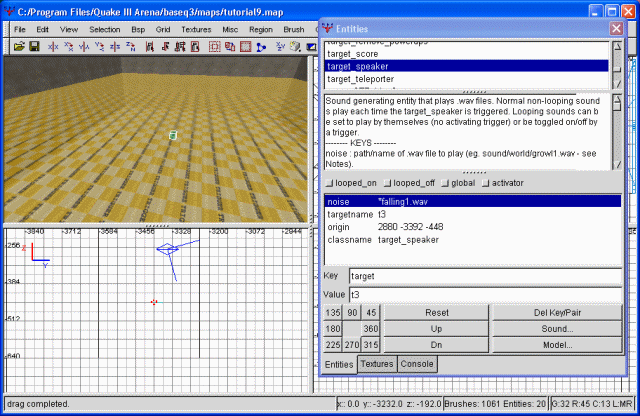
Falling to your death
Great. A few more things to polish up with that, and then we'll move right along. First, once gibbed, we almost immediately impact the floor. Since a bottomless pit feeling is more what we're aiming for here, let's just increase the depth. Also, the player isn't going to see much of anything (or care) once they hit the gib layer, so go ahead and just trace out new, solid walls with the simplest of textures on them. No reason to give them a performance hit when it doesn't matter. Do the same with the floor. Finally, let's add a nice fog layer. Just draw a large brush to fill the volume and texture it with a fog of your choice.
I checked it out, and I like the fog, it definetely adds a great aura. I used the same fog that we used in the water, in case you're wondering. However, it still takes too short a time to fall to the bottom of the shaft. The problem is elementary physics... in quake3, there's no such thing as terminal velocity, so basically your character model continues accelerating at 8.3m/sec (or thereabouts) indefinetely. To have a truly long fall, we'd have to make the shaft REALLY deep. Though we certainly could do that, I'd prefer not to have a 10,000 unit deep hole in my map. I guess we'll just have to live with it. There's also one more small issue that we're going to have to live with.
The falling sound was designed for regular quake. IE, no flying characters, or grapples. A character could potentially drop into the trigger_multiple area, triggering the screaming sound, without actually hitting the gib. In fact, they could grapple to the wall, and the scream would just continue playing. We can't put the trigger_multiple below or at the same level as the trigger_hurt, since a gibbed player doesn't activate triggers, so we're stuck. Besides, who's going to hang out in here listening to themselves scream during a game?
There's one last thing we have to add to this. What happens if a flag carrier falls and dies? Well, they get fragged and the flag falls to the bottom and remains untouchable until it returns. Obviously, we don't want to do this, so we're going to add an entity to stop that from happening. Draw out a brush that covers the entire floor. We'll need to texture this with a new texture under common called NoDrop. This prevents things (packs, flags) from dropping. The case of packs, they disappear, and flags return to the flag stand. This brush doesn't need to be too large, but feel free to make it as large as you want. NoDrop also has some additional properties which may be of interest. They prevent specials from being placed, more specifically things like sentry guns, lasers and alarms. Have somewhere that a sentry could ruin the game? Try putting a nodrop brush there. However, be careful, since anywhere you put a nodrop brush will return a flag. A good use would be on the bottom of things (such as our bridge), but try to avoid floors unless you mean for the flag to be returned (like here). Personally, I can't really think of many places we don't want people to put sentries yet, so we'll leave that for later.
Next we're adding some detail to the walkway. I'm also adding a large thing at the intersection, just to build on the Star Wars theme we've got going in this room. Here's a screenshot of what I came up with.
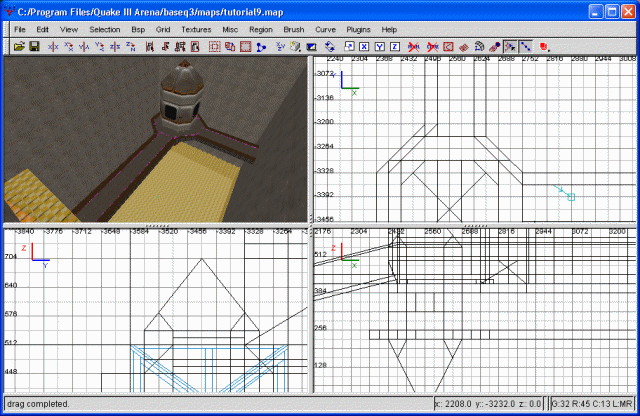
The completed walkways
Now we're going to add a small special effect to our 'thing'. First, draw a brush, centered on the 'thing' and extending to the ceiling. Next, choose curve, then cylinder. This turns our square brush into a cylindrical shape. Fun, eh? Texture this with sfx/beam_blue. This creates a neat look to add to our shaft.
Let's go ahead and make the other entrance to this room. I'm just doing precisely the same thing I did on the other entrance...same door and all. Simply some copying, pasting and rotating should be sufficient. Don't forget to change the target and targetname values, otherwise both doors will open when someone approaches either one. You may like this effect, of course, so it's your call. You'll also need to change the 'angle' values.
As you may have noticed, our secondary doorway doesn't match up very well to the courtyard. Let's ignore that for now and just finish detailing our shaft area. I'll proffer up a screenshot of the end result.
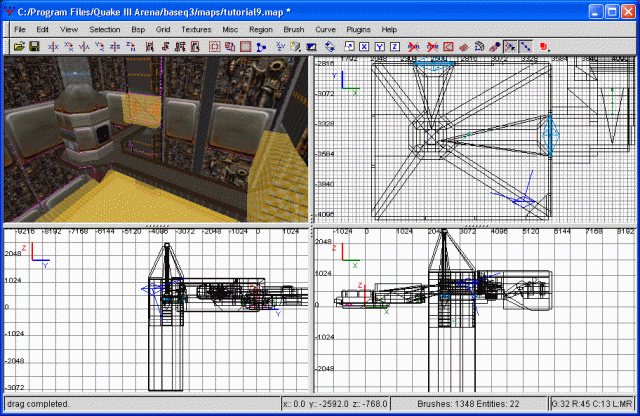
The shaft area is finished
As you may imagine, the above took quite a while. Among other things, I added a fan and grill at the top, as well as a playerclip layer to keep people from going too far up. The fan and grate textures are under sfx and should be fairly easy to use. Something to keep in mind is to only texture one side of the brush (the side facing the player), while leaving the other side as caulk. If you want to take a better look at the finish product, I recommend you download the map at the end of this tutorial, compile it, and take a look around yourself.
Our next step would be to attach our shaft area to the courtyard, but we're actually going to hold off on that. Instead, we're rebuilding the courtyard. We're going to enlarge it. In fact, we're going to take the walls that are closest to the flagroom (the one with the flag on it) and delete them, then redraw it so it matches the other side (the part where the sniper balcony springs from). I won't say why yet.
We're working under some space constraints (our flag room and water entrance get in the way) so size the courtyard appropriately. I began by drawing out the floor, which in turn gave me the ceiling/sky. Following that, it's just more gruntwork of drawing in all the wall brushes. Here's a screenshot, minus the playerclip brushes.
The courtyard grows
Now to make the courtyard entrance to our shaft. As luck would have it, the courtyard door is smaller than the doorway from the shaft (and hence the hallway from the shaft). In addition to that, they're not at the same elevation. No big deal. First, I'm taking the original entrance to our shaft (the neat, octagonal one), copying it, rotating it, and throwing it in place. I then elongated it so it reaches the courtyard.
Now we have a rough template of what we need to do. Following that, I'm going to go ahead and draw out the stairs and walkway. Next, I'm cutting up the ground to give me a nice hole. Allow me to share a screenshot with you of what we've done to this point.
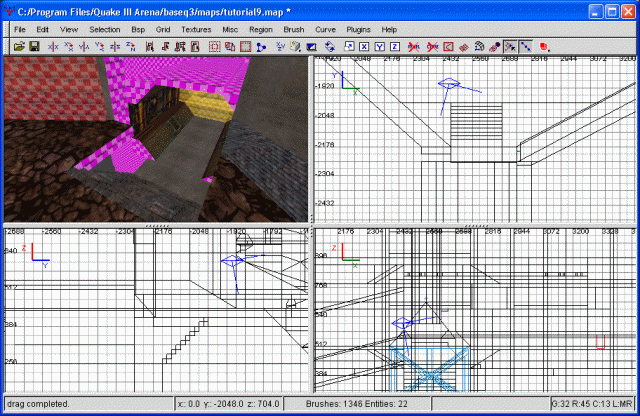
Courtyard to shaft entrance
Great. Now we just need to fill in the rest of the details to complete this part. That shouldn't be too difficult or time consuming. As mentioned before, things don't quite line up...the walkway is disproportionate to the hole in the courtyard side. This is unfortuanate, since neither one is easily adjusted.